How to Switch Payment Method on Spotify? Step-by-Step Guide
Are you a dedicated Spotify user who wants to switch to a different payment method? Whether you're looking to update your credit card information, switch from one payment provider to another, or explore alternative payment options, we've got you covered.
In this article, we'll walk you through the process of how to switch payment methods on Spotify, ensuring a seamless transition so you can continue enjoying your favorite Spotify tunes uninterrupted. So let's dive in and discover the steps you need to take to update your payment information on Spotify hassle-free.
Article Content Part 1. What Payment Methods Does Spotify Accept?Part 2. How to Switch Payment Method on Spotify?Part 3. How to Change My Spotify Payment Date and My Plans?Bonus Tips: Enjoy Spotify Songs Offline and Forever
Part 1. What Payment Methods Does Spotify Accept?
When it comes to paying for your Spotify subscription, the platform offers various payment methods to cater to different user preferences and convenience.
Here are the common payment methods accepted by Spotify:
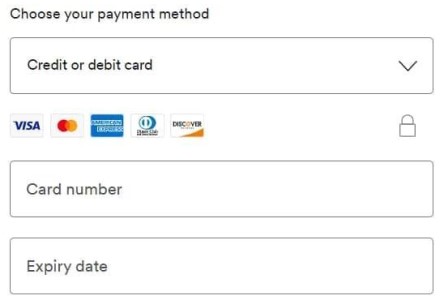
- Credit and Debit Cards: Spotify accepts major credit and debit cards, including Visa, Mastercard, American Express, and Discover. You can easily link your card to your Spotify account and set it as your primary payment method.
- PayPal: If you prefer using PayPal for online transactions, you’re in luck. Spotify allows users to link their PayPal account as a payment method, providing a secure and convenient way to manage their subscriptions.
- Spotify Gift Cards: Another popular payment option is using Spotify gift cards. These cards can be purchased online or from authorized retailers and can be redeemed to cover your Spotify subscription costs. Gift cards are a great option if you want to avoid linking your personal financial information to your Spotify account.
- Mobile Payment Services: Depending on your region and device, Spotify may accept mobile payment services like Apple Pay, Google Pay, or Samsung Pay. These services enable you to make payments using your mobile device, adding an extra layer of convenience.
It's worth noting that the availability of payment methods may vary based on your country of residence. It's always a good idea to check Spotify's website or contact their customer support for the most up-to-date information regarding accepted payment methods in your region.
Part 2. How to Switch Payment Method on Spotify?
If you're looking to switch your payment method on Spotify, whether it's updating your credit card details, switching to a different payment provider, or exploring alternative options, follow these steps to make the switch hassle-free:
- Log in to Your Spotify Account: Visit the Spotify website and log in to your account using your credentials. If you prefer using the Spotify mobile app, open the app and sign in.
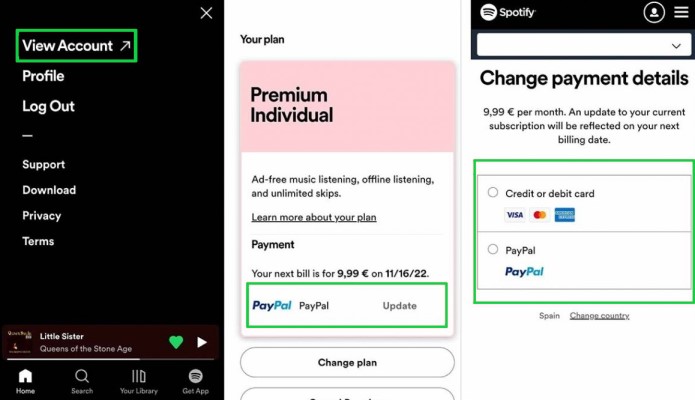
- Access Your Account Settings: Once you’re logged in, locate and click on your account name or profile picture. From the dropdown menu, select “Account” or “Account Settings.” This will take you to your account settings page.
- Navigate to the Payment Section: Find the section related to payments or subscriptions on the account settings page. The exact location and wording may vary, but it should be easily identifiable.
- View Your Current Payment Method: In the payment section, you’ll see your current payment method displayed. Take note of the details or the card associated with your account before proceeding with the switch.
- Select the “Change” or “Edit” Option: Look for an option that allows you to change or edit your payment method. It may be labeled as “Change Payment Method,” “Edit Payment Details,” or something similar. Click on that option to proceed.
- Choose Your New Payment Method: Spotify will present a list of available payment methods. Select the one you want to switch to. If you’re updating credit card details, you may need to enter the new card information at this stage.
- Verify and Confirm: Once you’ve selected your new payment method and provided any required information, carefully review the details to ensure accuracy. Double-check the card number, expiration date, and other relevant information. When you’re confident everything is correct, click on the “Confirm” or “Save” button to finalize the switch.
- Confirmation and Verification: After confirming the change, Spotify will verify the new payment method. This process usually involves a small authorization charge or a verification step to ensure the card or payment method is valid. Follow any additional prompts or instructions provided by Spotify to complete the verification process.
- Enjoy Your Updated Payment Method: Once the verification is successful, your payment method on Spotify will be updated. You can now enjoy uninterrupted access to your favorite music and features using your new payment method.
Remember to keep track of your billing cycles and ensure your new payment method remains active and up to date to avoid any interruptions in your Spotify subscription.
Part 3. How to Change My Spotify Payment Date and My Plans?
If you're looking to change your Spotify payment date or switch to a different subscription plan, Spotify provides options to customize your billing preferences.
Follow these steps to make changes to your payment date and plans:
- Log in to Your Spotify Account: Visit the Spotify website and log in to your account using your credentials. Alternatively, open the Spotify mobile app and sign in.
- Access Your Account Settings: Once logged in, locate and click on your account name or profile picture. From the dropdown menu, select “Account” or “Account Settings” to access your account settings page.
- Navigate to the Subscription or Plans Section: Find the section related to your subscription or plans on the account settings page. The wording may vary slightly, but it should be easily identifiable.
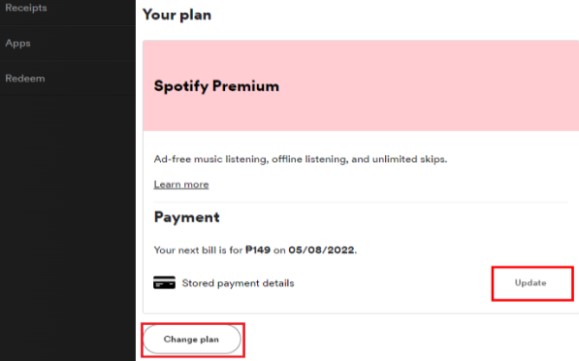
- View Your Current Plan Details: In the subscription or plans section, you’ll see information about your current plan, including the payment date and the features it offers. Take note of your current plan details before proceeding.
- Change Your Payment Date: If you wish to change your payment date, look for an option that allows you to modify it. This may be labeled as “Change Payment Date,” “Modify Billing Cycle,” or something similar. Click on that option to proceed.
- Select a New Payment Date: Spotify may provide you with a calendar or dropdown menu to choose a new payment date. Select the date that best suits your preferences. Note that not all dates may be available, and availability may vary depending on your current billing cycle.
- Confirm the Payment Date Change: After selecting the new payment date, carefully review the changes. Ensure that the date you’ve chosen aligns with your billing preferences. Once you’re satisfied, click on the “Confirm” or “Save” button to finalize the payment date change.
- Modify Your Subscription Plan: If you also wish to change your subscription plan, look for an option that allows you to modify it. This may be labeled as a “Change Plan,” “Upgrade/Downgrade Subscription,” or something similar. Click on that option to proceed.
- Choose Your New Subscription Plan: Spotify will present you with a list of available subscription plans. Review the features and pricing of each plan and select the one that best suits your needs. Click on the corresponding button or link to choose the new plan.
- Confirm the Plan Change: After selecting the new subscription plan, carefully review the changes. Ensure that the features and pricing align with your preferences. Once you’re satisfied, click on the “Confirm” or “Save” button to finalize the plan change.
- Enjoy Your Updated Payment Date and Plan: After confirming the changes, Spotify will update your payment date and subscription plan accordingly. You can now enjoy your music and features based on the newly selected options.
Bonus Tips: Enjoy Spotify Songs Offline and Forever
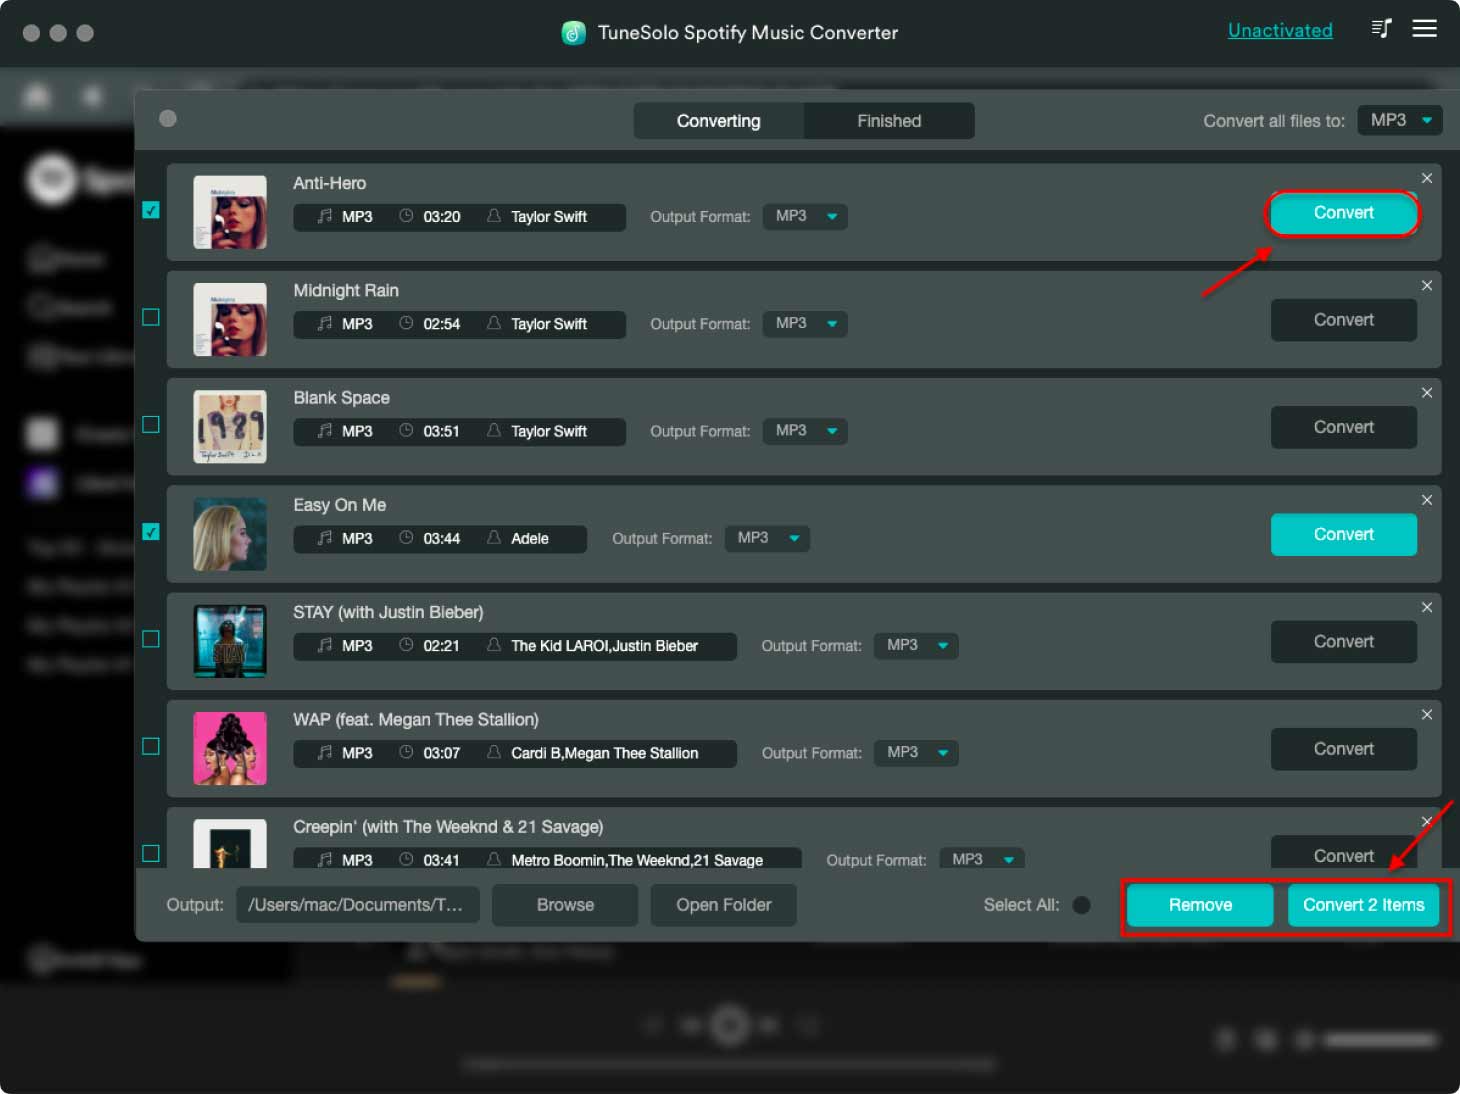
If you're looking to enjoy your favorite Spotify songs offline and forever, there's a handy tool called TuneSolo Spotify Music Converter that can help you achieve just that. This software allows you to convert Spotify songs, playlists, and albums into various audio formats, such as MP3, WAV, FLAC, and more.
With TuneSolo Spotify Music Converter, you can bypass Spotify's DRM (Digital Rights Management) protection, which restricts the usage of Spotify songs outside of the Spotify app. TuneSolo converts multiple Spotify songs, playlists, or albums in bulk. This saves you time and effort by efficiently converting your entire music library with just a few clicks.
By converting your Spotify tracks with this tool, you can have full ownership and control over your music, enabling you to listen to them offline and on any device without any limitations.
In addition to removing DRM, TuneSolo Spotify Music Converter preserves the original audio quality and retains all the metadata, including song titles, artists, album information, and even album artwork. This ensures a seamless and high-quality listening experience, even when you're offline.