How to Remove iTunes DRM for Free [2026 Complete Guide]
There are only a few people nowadays who are not aware of the iTunes application and the many things one can actually enjoy from using it. With iTunes, every user can manage files – videos, music, audiobooks, and more. When it comes to music, they can even purchase from the iTunes store to enjoy those anytime they want to. Surely, many of us are still using iTunes as our music player and file manager. But do you know that iTunes files have DRM protection? Are you aware of the process of iTunes DRM removal and the tools you can use to do so?
Since iTunes files have DRM protection, people are having a hard time saving those files and even in sharing those with others. Files with such protection are not allowed to be played on unauthorized devices and gadgets. Thus, giving the users a headache. Luckily, there are some software applications that people can use in order to proceed with iTunes DRM removal and freely stream all the music and even other iTunes files. And, those are what we are to discuss in this blog post so make sure to keep on reading especially if you are facing the same dilemma now.
Article Content Part 1. iTunes and DRM-What You Need to KnowPart 2. Remove iTunes DRM in Apple Music with TuneSolo Apple Music ConverterPart 2. Other iTunes DRM Removal Software ApplicationsPart 3. Added Solution: Burn DRM Protected iTunes to CD or DVDPart 4. Conclusion
Part 1. iTunes and DRM-What You Need to Know
iTunes used to implement digital rights management (DRM) on music and videos purchased through the platform. DRM was a method used to control the use of digital content and prevent unauthorized redistribution. However, in 2009, Apple announced that it would start offering DRM-free music from all the major labels, allowing users to purchase and download music without the limitations of DRM. Additionally, Apple phased out DRM for all iTunes-purchased music in 2009, making the entire iTunes catalog DRM-free. This move was well-received by consumers and marked a significant shift in the digital music industry.
Therefore, after 2009, all iTunes music is free of DRM restrictions, but it was not possible before 2009. In addition, Apple Music subscribers can download their favorite tracks for offline listening, but these downloads come with DRM restrictions. If you cancel your Apple Music subscription, you will lose access to these downloaded songs. That’s why it’s especially important to learn how to remove DRM from your music and iTunes.
Part 2. Remove iTunes DRM in Apple Music with TuneSolo Apple Music Converter
DRM protection is no longer an issue as nowadays, there have been a lot of software applications with the ability to do iTunes DRM removal that was introduced to the public. Most of those are surely great and can cater to the users’ needs when it comes to iTunes DRM removal. However, one must stay observant enough to choose the best from those tools the web is suggesting.
The best tool that one must use in order to remove the DRM from iTunes music is this TuneSolo Apple Music Converter. What is this tool capable of?
- DRM removal.
- TuneSolo Apple Music Converter can do the conversion of iTunes music from one format to another.
- Several input and output formats are supported.
- The processing of multiple files is possible.
- Fast speed during conversion and downloading.
- Easy to understand interface.
When it comes to iTunes DRM removal, below are the procedures that one must follow.
Step 1: Download and launch TuneSolo Apple Music Converter.
Step 2: Add the files to convert and choose the format of the resulting file.
Step 3: Finish off with conversion.
Details for each step are highlighted in the succeeding texts.
Step #1. Downlaod and Launch The TuneSolo Apple Music Converter
Actually, unlike the other software applications known to the public, the requirements in order to completely install the TuneSolo Apple Music Converter are only a few and easy to fulfill. You can click the safe button below to remove iTunes DRM for free.
Upon completing those needed things, the installation would surely be successfully completed. After doing so, you can freely launch the tool to begin with the whole process and finally do the iTunes DRM removal.
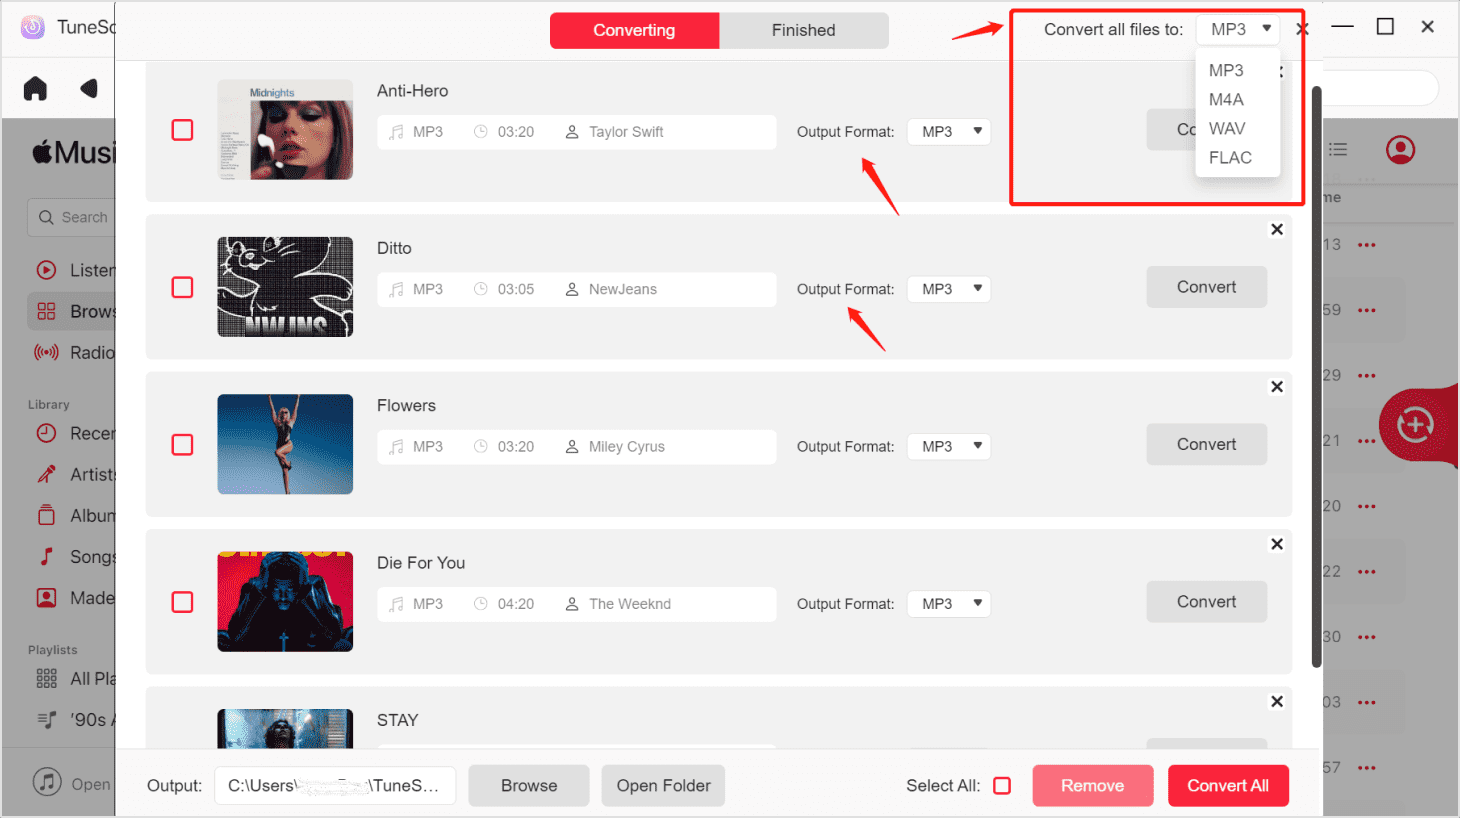
Step #2. Add The Files To Convert And Choose The Format Of The Resulting File
After arriving at the main interface, you can now add the iTunes music to be converted and downloaded. Luckily, you can add as many as you want since the tool can support batch processing of files. This should only last for some minutes. Now, you can choose the output format that you want the files to be converted to. There are many available formats. The recommended is MP3 as this format is playable on any media and music players.
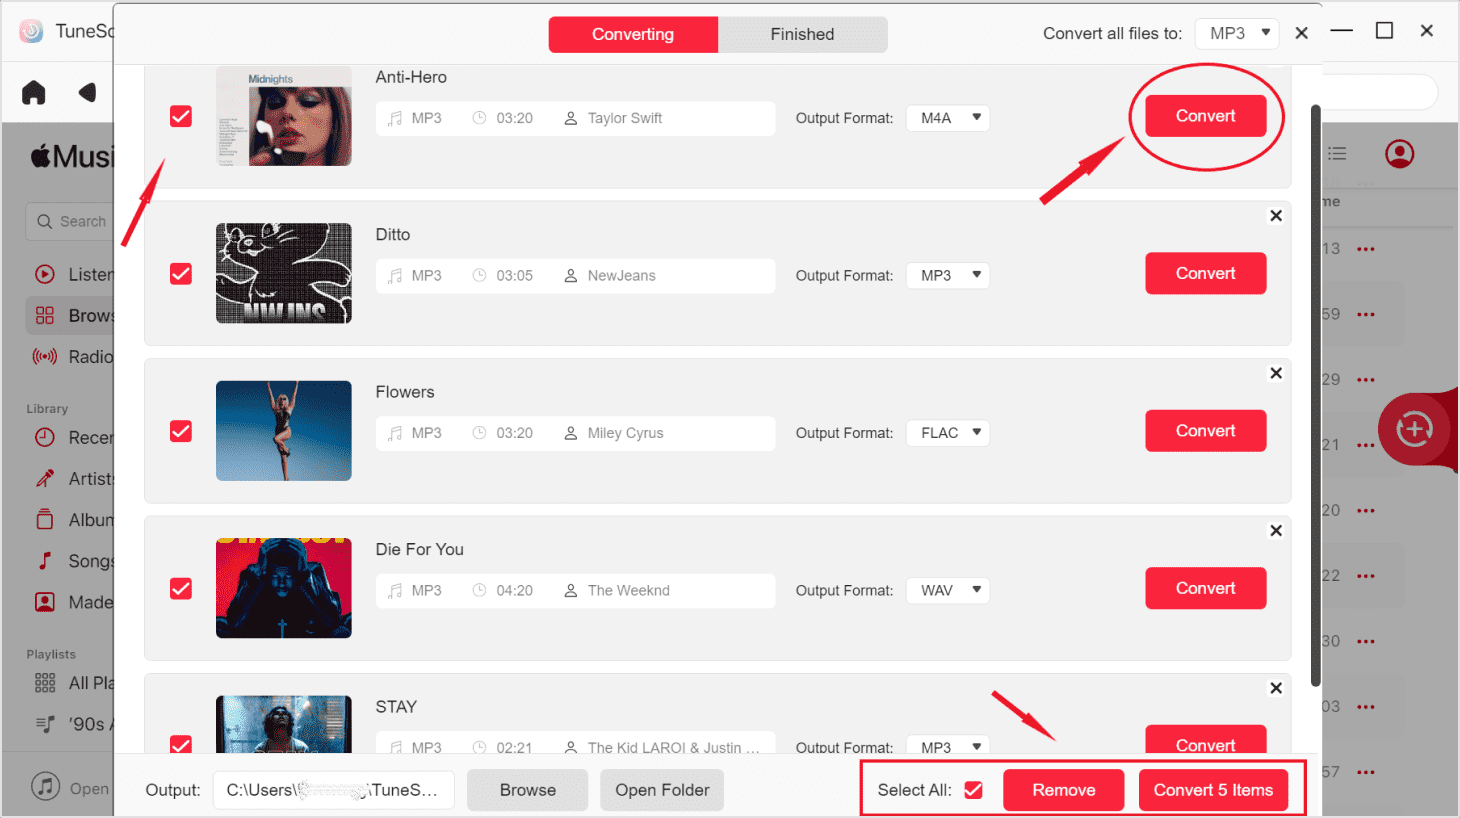
Step #3. Finish Off With Conversion
The last thing that is needed is to finish everything with the process of conversion. This can be done by simply hitting the “Convert” button that is located at the bottom portion of the screen. There are also status bars that will help you monitor the progress of the conversion process of each file. You would only wait for a few minutes as files would be converted only after some time.
The converted files that would be downloaded will now be ready for sharing with others and for playing on any media players and even devices. TuneSolo Apple Music Converter is the best tool every user can enjoy in order to proceed with iTunes DRM removal. But, are there any other software applications? Learn about those in the next part of this article.
Part 2. Other iTunes DRM Removal Software Applications
There are still some other iTunes DRM removal software applications. Here are those.
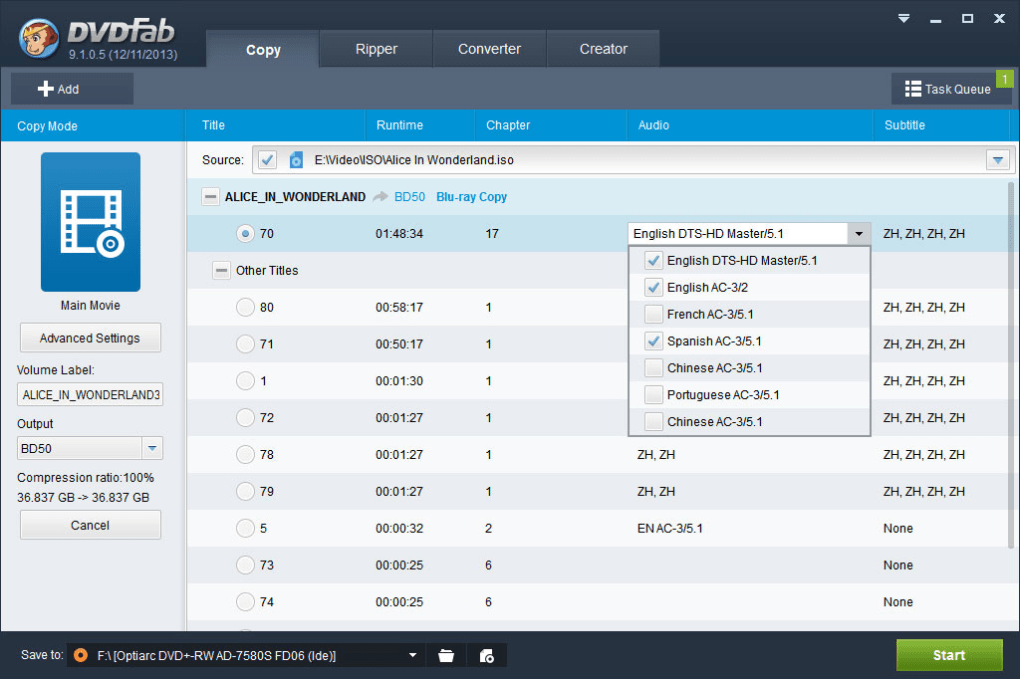
DVDFab DRM Removal Software Application
DVDFab DRM Removal is one application that was designed in order to process the removal of DRM for iTunes files. Not only Apple Music but other files like videos and audiobooks can be converted to DRM-free outputs in just a matter of minutes. What is good about this is that it is capable of doing the lossless conversion. Thus, maintaining the original quality of files. Here are the advantages and disadvantages of using this tool.
The Advantages of Using DVDFab DRM Removal
- Has the ability to remove DRM from iTunes files.
- DRM protection of iTunes purchases and rentals can also be removed.
- Can be installed on both Windows and Mac computers.
- Fast removal and conversion speed.
The Disadvantage of Using DVDFab DRM Removal
- It can only support two output formats – M4A and MP4.
TunesKit DRM Media Converter
Another iTunes DRM removal tool is this TunesKit DRM Media Converter. It is known to be easy to use as it has a very friendly user interface that anyone can navigate. It is capable not only of DRM removal but as well as converting files to many supported audio and video output formats. In using this tool, users can modify some parameters like bit rate and more.
The Advantages of Using TunesKit DRM Media Converter
- The ability to remove the DRM protection from both purchased and rented iTunes files.
- Customization in the output settings is possible.
- Supports installation on both Windows and Mac computers.
The Disadvantage of Using TunesKit DRM Media Converter
- It does not support the removal of DRM from music and other files that are protected.

Part 3. Added Solution: Burn DRM Protected iTunes to CD or DVD
Another way to get DRM-free music from iTunes is to burn those to CD or DVD. There is no need for any software to proceed with this. You only need to keep your iTunes running and of course a blank CD or DVD to continue. The tutorial that you need to follow is simple and easy. Check out below.
- Make sure to insert the CD/DVD on the computer’s drive.
- Add the iTunes songs to burn on the disc.
- Do the burning process.
- Import the files from CD or DVD.
Step #1. Make Sure To Insert The CD/DVD On The Computer’s Drive
Open the iTunes application on your computer. Make sure that you will be inserting the blank CD or DVD onto your computer’s drive. Once this has been successfully done, head to the iTunes application and go to the “File” button. From the new options displayed, choose the “New Playlist” button and rename it the way you want.
Step #2. Add The iTunes Songs To Burn On The Disc
After the creation of a new playlist, you may now select the iTunes music files that you want to convert and remove the DRM protection. To do this, go to the iTunes library and simply do the dragging and dropping of files from the library to the new playlist that was recently created.
Step #3. Do The Burning Process
Upon completion of the adding of iTunes files, you need to right-click the name of the playlist created. From those displayed, select the “Burn Playlist to Disc” option. A new window will be on the screen asking you to choose the kind of CD or DVD that you wish to burn. You need to choose the “Audio CD” menu. The burning process will then begin, and the selected iTunes music files will be later on available on the disc.

Step #4. Import The Files From CD Or DVD
Now that the burning process has been done, you need to rip the songs. To do this, choose the “Edit” tab followed by the “Preferences” option then the “General” button. From those seen on the screen, select “Import Settings”. The disc must be inserted onto the CD drive and there is a need to hit the “Yes” button to finally begin.
You have to wait until the ripping process has been completed. After that, you can be assured that the files that you now have are DRM-free ones. Stream those and play on any device or media player.
Part 4. Conclusion
iTunes DRM removal is so easy to perform through the help of various professional applications such as the TuneSolo Apple Music Converter. If you happen to look for one, you can check out this tool and try all those steps presented. If in the past, you were able to do the DRM removal process, can you share what specific thing you did?

