How to Backup iTunes Music for Free?
We all know that Apple has a lot of issues, one of which is data loss. Hence, it’s a good idea to save copies of your files in another storage drive. However, there have been some questions as to whether it’s possible to learn how to backup iTunes music.
After all, Apple implements a lot of regulations for their music. For one, you can’t save a copy of your iTunes files since they are protected with FairPlay DRM. However, we’re going to change all of that in this guide.
This article will talk about how to backup iTunes music to iCloud as well as discuss the benefits of having a backup. Let’s start by answering some of your questions.
Article Content Part 1. Why Do We Need to Backup iTunes Music?Part 2. How Do I Backup iTunes on My Computer??Part 3. The Best Software to Backup iTunes Music Part 4. Summary
Part 1. Why Do We Need to Backup iTunes Music?
Having a backup gives you peace of mind that you won’t be losing your files. In addition, there are also other benefits of having a backup, and there are disadvantages of having no backups. Let’s proceed with benefits.
Accessibility
First and for most, backing up your iTunes music will effectively store all those songs in one place. Hence, whenever you feel the need to access your files, you don’t have to search for it from your computer. You can simply extract it from the backup you have created. Moreover, if you created the backup on the cloud, it would be much simpler.
Protection
There are several factors that may lead to the destruction of your hard drive. This includes power outages, malware, virus, and the likes. By creating a backup of your files, you’re technically protecting those files from going extinct due to such issues. This is especially true nowadays since viruses are becoming more and more advanced.
OS Failure Recovery
If you didn’t know, most computer damages are caused by OS failure. You may be able to delay it, but OS failure cannot be completely avoided. That’s why you might as well create a plan to safeguard your iTunes music against this situation.
The causes of computer failures vary and they are numerous in number. This just proves my point that finding out how to backup iTunes music is a good idea in the long run, not to mention the limitations of iTunes.
FairPlay DRM
As you may already know, iTunes has a lot of restrictions. One of these restrictions is the FairPlay DRM which prevents users from transferring their music to other devices. So, if you have a backup of your iTunes library, you can transfer iTunes library to another computer or device. Having said that, let’s find out how to backup iTunes Music on your Windows 10 PC.

Part 2. How Do I Backup iTunes on My Computer??
There’s only one official way to backup iTunes music on PC. Although I will discuss the alternative later on, that’s the truth. Hence, what we’ll tackle here are the three steps on how to backup iTunes music rather than several methods. So without further ado, let’s start with the very first step.
How to Backup iTunes Music?
- Consolidate Your iTunes Library
- Find the iTunes Media folder
- Back Up iTunes to the External Hard Drive
Step 1. Consolidate Your iTunes Library
The first step on how to backup iTunes music on PC is to consolidate iTunes library. So what does consolidating the library do?
Practically, it makes sure all the files that are related to iTunes will be sent to one folder. This includes podcasts, music, movies, and such. Since iTunes files often end up on other folders, this is a good start if you want to include all iTunes music. Here’s how it works:
- Start the iTunes program on your computer.
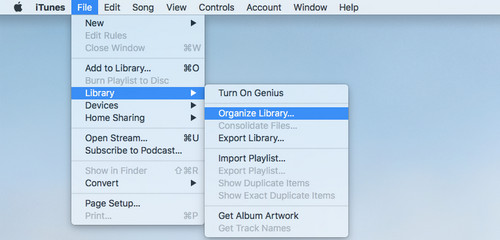
- At the top of the window, you will see the menu bar with several options. Select File > Library and click on Organize Library.
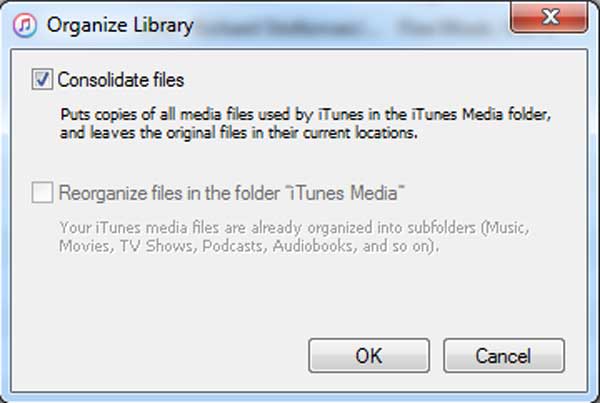
- The Organize Library window will pop up on your screen. Now you need to check the box for Consolidate files.
- Click on the OK button at the bottom-right corner of the popup window.
Now all you have to do is to wait while iTunes automatically detects all the files outside of the iTunes folder and copies them into the iTunes Media folder. Yes, it copies the file instead of moving them, so you might as well delete the old files outside if you want to save storage space.
Step 2. Find the iTunes Media folder
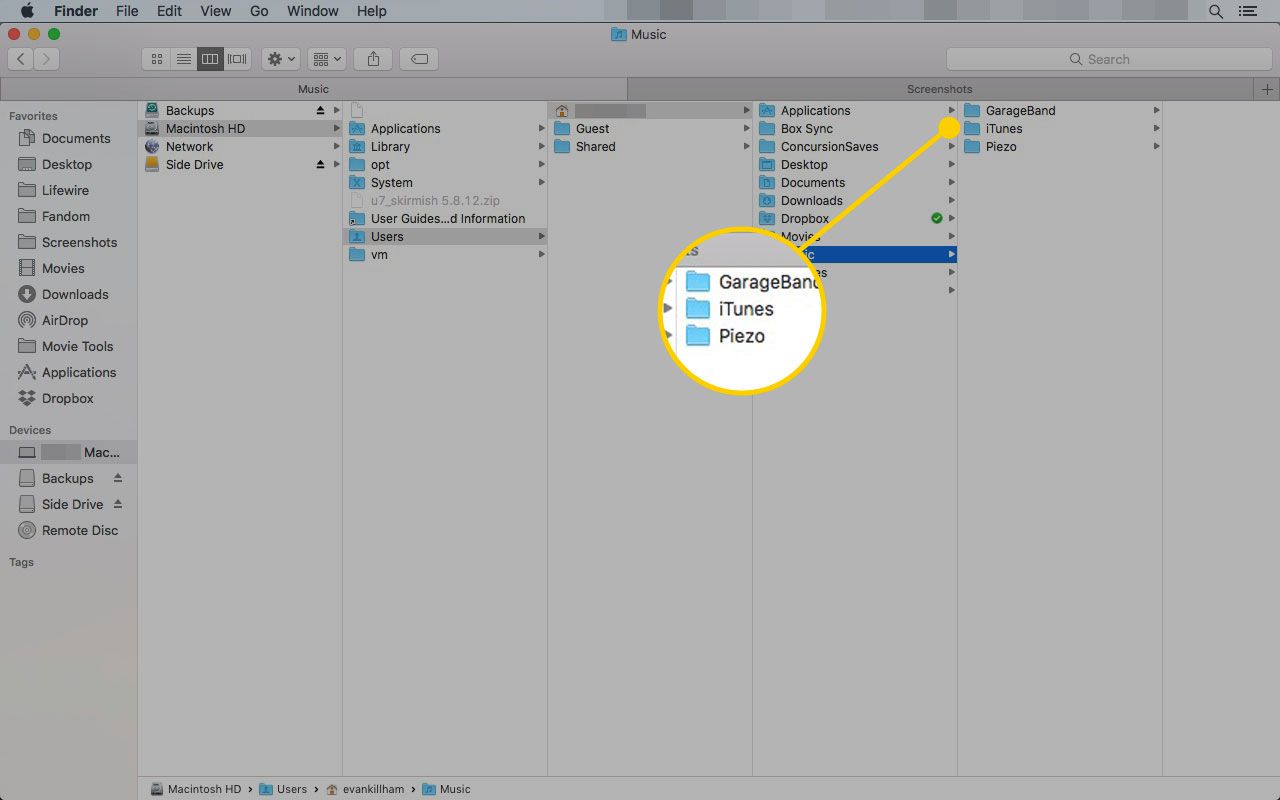
Now that all files are located in the iTunes Media folder, obviously, you’d want to look for that folder since we’re going to create a backup out of it.
Normally, the iTunes Media folder is located on the iTunes folder. This can be accessed by going to the User menu. From there, select Music > iTunes then click on iTunes Media. However, there are cases where it’s located in other places. That’s why to know the exact location or path of the folder; you have to follow these steps:
- Open the iTunes program.
- From the top menu bar, select Edit and click Preferences.
- Go to the Advanced tab.
- You will see a box in this tab with a caption at the top saying “iTunes Media folder location”. Obviously, this is where the iTunes Media folder is located.
- Close the iTunes popup window.
Some users are having a problem looking for their iTunes Media folder even after following these steps. This might be because you’re not using the Administrator user of your computer. Thus, I suggest logging out and logging back in but this time, use Administrator privileges.
Step 3. Back Up iTunes to the External Hard Drive
Now that you’re in possession of the iTunes Media folder location, it’s time to learn the final step on how to backup iTunes Music. Let’s proceed with the steps:
- Quit the iTunes program.
- Go to the iTunes Media folder. This should be quite easy if you have followed the second step carefully.
- Once you’ve located the folder, right-click on the folder and select Copy.
- Now connect the storage drive where you want to store the backup into your computer.
- Once connected, open the storage drive and right-click on any blank space.
- Select Paste this time.
This will create a copy of your whole iTunes media folder into the said storage drive. Remember that this includes other files such as movies, videos, and other files that can be considered as “media” via iTunes’ algorithm.
Part 3. The Best Software to Backup iTunes Music
Although it’s true that you can create a backup of your iTunes media folder, it doesn’t always work, especially on old files. This is because files that were made prior to 2009 have DRM protection which makes them basically inaccessible outside of iTunes. For this, you need a tool.
TuneSolo Apple Music Converter is a special tool with the ability to create a complete copy of your files at a very fast rate. It doesn’t matter what kind of file it is, as long as it’s located on iTunes. With this tool, you can backup your iTunes library easily.
Below are the main features of this software:
- DRM Removal. The most important feature of this software is DRM removal, at least in your situation. Since you can’t copy your files since they have DRM, you just have to remove their DRM protection using this software, as simple as that
- Offline Listening. Another notable feature of this software is its ability to support offline listening. Once you download the music, you can listen to them with no internet. This can be accessed on PSP and Xbox consoles, iOS and Android devices, and more
- Faster Conversion. You may also like the idea of a fast conversion rate. Particularly, TuneSolo has a conversion speed of up to 16 times the normal rate of common converters. Moreover, you can download multiple files at the same time
- Supported Formats. TuneSolo is also known as flexible software as it supports several formats including AIFF, AAX, MP3, MP4, WAV, M4V, and more

Now that you’re aware of these things, it’s the perfect time to learn how to backup iTunes music to an external hard drive using this wondrous software:
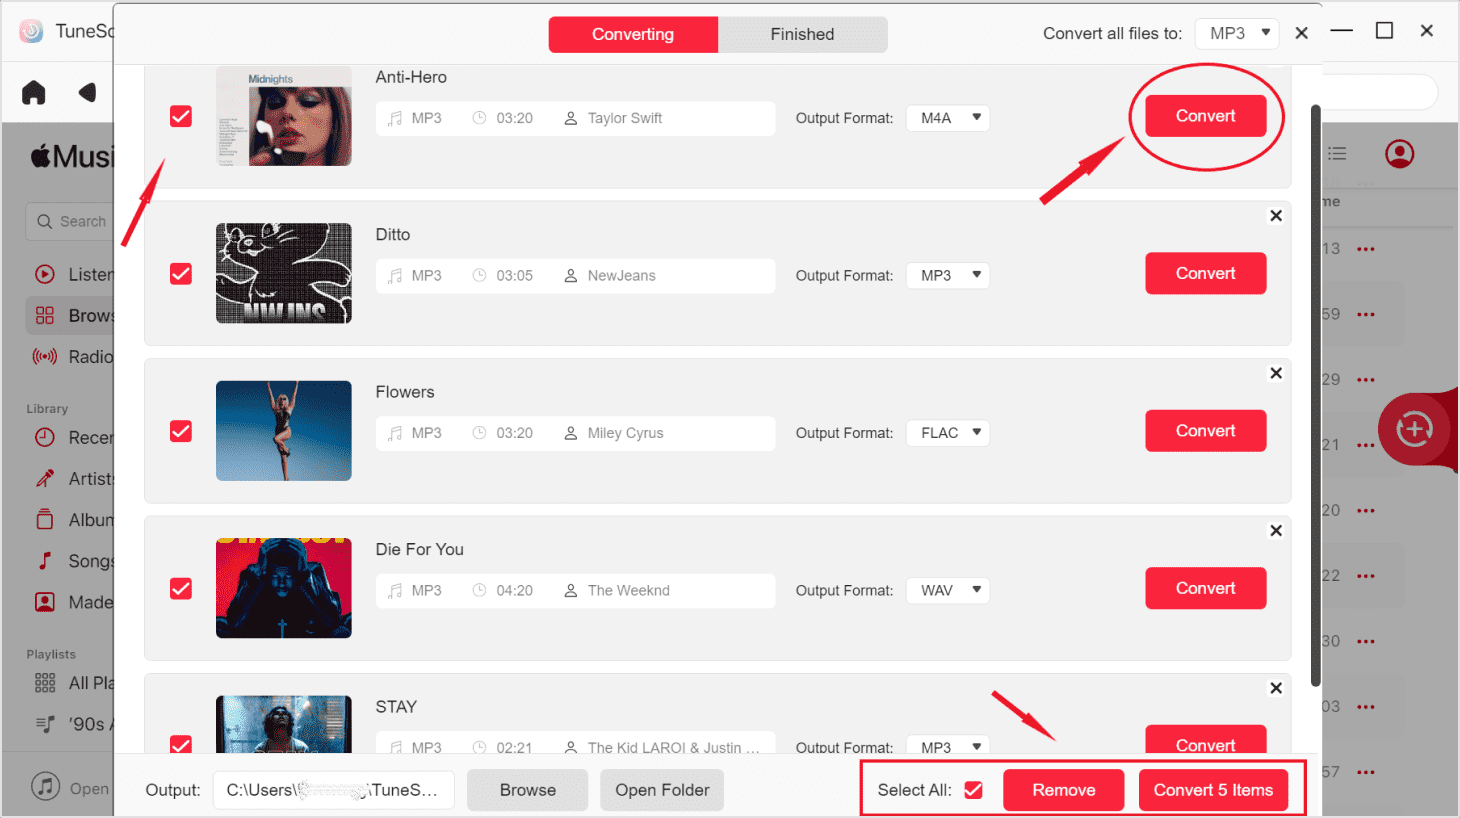
Step 1. Choose iTunes Music
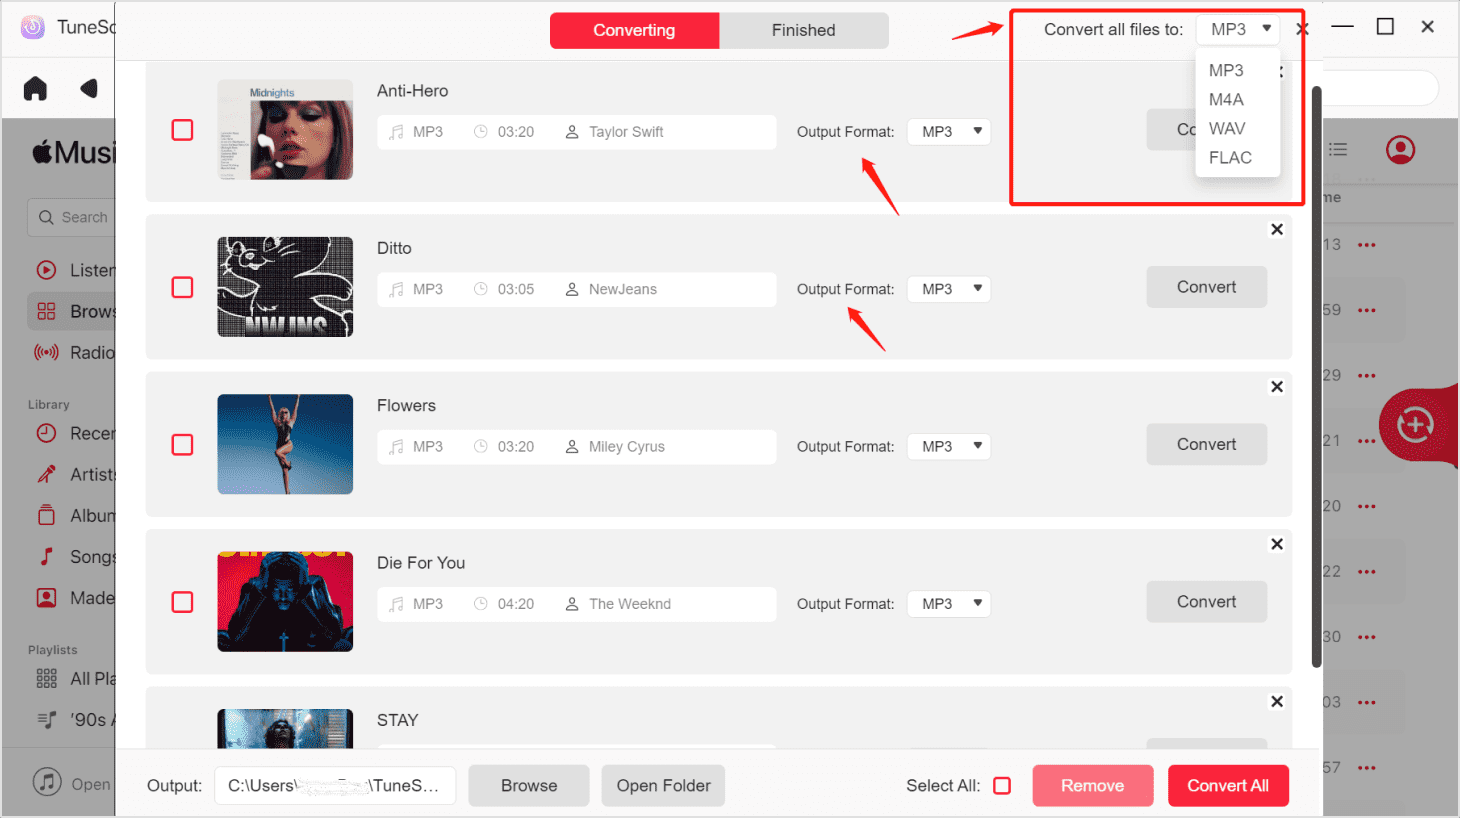
Firstly, what you need to do is make sure iTunes is installed on the computer. Once you confirm this, you can continue by opening the converter. The first thing you’ll notice is a vast list. From this list, you should select the iTunes Music that you want to include in the backup.

Step 2. Adjust Settings
The next thing you need to do is go to the bottom of the software where you’ll see the Output Settings. From this section, you can change the format, quality, and other things regarding the output.
Step 3. Download/Convert iTunes Music
Lastly, you need to click the Convert button. By doing so, you’ll be signaling the start of the conversion and download process. All you have to do now is wait until the process is done.
Tip: Please make sure that Apple Music/iTunes is closed before opening Apple Music Converter. And during the song conversion, please do not do any operation on Apple Music/iTunes.
Part 4. Summary
Creating a backup of your iTunes music is an essential step to ensuring that you won’t be losing your files. However, Apple made it harder for us by embedding DRM protection on all their files. Fortunately, there are ways to bypass such a policy.
Moreover, now that you know the benefits of having a backup, you should feel the need to always create backups of your files. Hopefully, this article helped you as much as it helped others.

