3 Easy Options to Sync iTunes Playlist to iPhone for FREE
iTunes offers a lot of good music. That’s why it’s only normal if you tend to transfer music from iTunes to iPhone every once in a while from your iTunes playlist to your iPhone. However, after doing it several times, you must’ve spent a good deal of your time with this chore. Unfortunately, it’s your only option if you want to keep listening to your iTunes playlist, but is it really your last resort?
As luck would have it, Apple developed a way for us to easily sync iTunes playlist to iPhone. That way, you won’t ever have to transfer the music manually, because iTunes will do it for you. The best part about this is that it’s free.
So in this guide, you will be learning how to sync music from iTunes to iPhone without spending a dime. We will also discuss an alternative if you want to make this task simpler. Let’s get started!
Article Content Part 1. Why Do We Need to Sync iTunes Playlist to iPhone?Part 2. How do I Sync iTunes Playlist to iPhone with Ease?Part 3.Transfer iTunes Playlist to iPhone without SyncingPart 4. Summary
Part 1. Why Do We Need to Sync iTunes Playlist to iPhone?
Without a doubt, iTunes is a very powerful program. You can use it to access your files in a simple manner. Plus, you get to access exclusive content through the software. However, it’s not perfect. There are limitations, and thus, better solutions are made. So what exactly are these limitations that we’re talking about?
Limitations of iTunes
The main limitation of iTunes is the fact that it’s no longer updating. After all, Apple has abandoned it for quite some time now. It’s only normal to look for alternatives. But of course, iTunes has other limitations besides that such as the following:
- You can’t use multiple accounts and sync your iTunes playlists between these accounts
- You can’t manually delete a song from an iTunes playlist
- It’s not very fast compared to when you’re using your iPhone
- There are several issues that may arise due to bugs that Apple hasn’t fixed yet
- You can’t customize how the iTunes window looks like
These and many other limitations are the reasons why iTunes was abandoned in the first place. And that is why we try to sync iTunes playlist to iPhone instead. That way, we won’t use iTunes again to manually transfer our files.
![]()
Benefits of Syncing iTunes Playlist to iPhone
On a side note, there are several benefits of syncing your iTunes playlist to iPhone, and that’s what we’re going to talk about right now. Let’s proceed with these benefits:
- Storage – Since you’re going to sync your iTunes playlist to your iPhone, you can save storage space for the entire RAM that is used up when you constantly transfer the files. Thus, you’re effectively saving storage
- Portability – Syncing your iTunes playlist to your iPhone also results in better portability. After all, when you travel with just your iPhone in you, you can’t exactly transfer the files since you can’t access your computer
- Accessibility – Once you sync iTunes playlist to iPhone, it would come in handy in case you want to access a particular file from that playlist.
- Security – You can also rest assured that your songs from the iTunes playlist will be safe, considering how it’s stored on each of your devices
- Sharing – Lastly, after syncing iTunes playlist to iphone, you can easily share your iTunes playlist with your friends since it is now on your iPhone. You can share it either through AirDrop, Bluetooth, or other methods
As you can see, not only will you be able to avoid the regulations and disadvantages of iTunes, you will also enjoy the benefits when you sync iTunes playlist to iPhone.
Part 2. How do I Sync iTunes Playlist to iPhone with Ease?
You now know the limitations and benefits of syncing iTunes. So how do I access my iTunes library on my iPhone? There are three methods available to you.
Sync iTunes playlist to iPhone via iTunes
The first method is to use iTunes to sync iTunes playlists to iPhone, you can check out the specific steps below:
Step 1. Begin by connecting your iPhone to your computer using a USB cable. If iTunes doesn't open automatically, be sure to launch it.
Step 2. In the iTunes window, locate and click on your iPhone at the top. Then, navigate to the Music section and tick the box next to "Sync Music."
Step 3. Opt for "Selected playlists, artists, albums, and genres." From there, choose the specific playlist you wish to synchronize with your iPhone.
Step 4. To finalize the process, click on the Apply button at the bottom. This action will add the selected playlist to your iPhone.
Sync iTunes playlist to iPhone via iCloud
If you have subscribed to Apple Music. You can also follow the steps below to learn how to wirelessly sync iTunes playlists to iPhone using iCloud Music Library.
Step 1. Begin by launching iTunes on your computer. Navigate to the menu bar at the top of the iTunes window and select "Edit" > "Preferences." Enable "iCloud Music Library" under the "General" tab, then click "OK."
Step 2. Allow iCloud to match and upload your music library. After the process is finished, open the "Music" app on your iPhone. Click on the "My Music" tab and select "iCloud Music Library."
Note: Using iCloud Music Library necessitates an Apple Music subscription, which is priced at $10 per month. Additionally, only music that is accessible in the iTunes Store can be synchronized through this method.
These two methods highlight certain limitations when attempting to import iTunes playlists to iPhone using iTunes or iCloud. Now, we will introduce an alternative, which is both free and not reliant on iTunes or iCloud, allowing you to sync iTunes playlists to your iPhone without the risk of data loss.
Part 3.Transfer iTunes Playlist to iPhone without Syncing
From the above guide on how to sync iTunes playlists to iPhone, you can see that the whole process can be a bit complicated and has certain limitations. Here we would like to provide a professional tool - TuneSolo, which can help you download iTunes songs for free and transfer them to any device.
TuneSolo Apple Music Converter is a tool with the ability to take out the files from your iTunes playlist and download them individually. The best part about this is that you get to keep the downloaded files forever, so it’s a huge advantage. If you think this software would be very helpful, you can find out more about it below:
Main Feature:
- DRM Removal. This software has the ability to remove the FairPlay DRM protection from your iTunes playlist. Once the DRM protection is removed, you’ll be able to do whatever you want with the playlist. You can even transfer the playlist to your iPhone without any hassle
Other Features:
- Offline Listening. In addition to keeping them forever, you can also listen to the iTunes playlist without the internet. You can do this on your iOS device, Zune, Xbox, PSP console, and even Android
- Faster Conversion. TuneSolo featuring a fast conversion speed. It can go 16 times faster than that of your typical converter. What’s more, it has the ability to support batch processing, so you can convert and download multiple files at once
- Supported Formats. TuneSolo supports most formats that you encounter. This includes popular formats such as MP3, MP4, and WAV. It also includes formats that aren’t very well-known like M4V, M4B, AAX, and many more
Without a doubt, TuneSolo is a powerful tool. Below are the steps on how to transfer iTunes to iPhone with this software:
- Pick iTunes Playlist Songs
- Adjust Output Settings
- Convert iTunes Playlist
- Transfer iTunes Playlist to iPhone
Though the above is simple, we still have some details here that can give you guidance.
Step 1. Pick iTunes Playlist Songs
On your computer, ensure that iTunes is installed. After that, you can open the Apple Music Converter. Once open, you’ll see a list on the main page. This will be where you have to select the iTunes playlist songs that you want to transfer to your iPhone.

Step 2. Adjust Output Settings
After selecting the iTunes playlist songs, scroll down to the bottom area. This is where you’ll find the output settings. Simply adjust the settings located here such as the codec, bit rate, sample rate, and others.
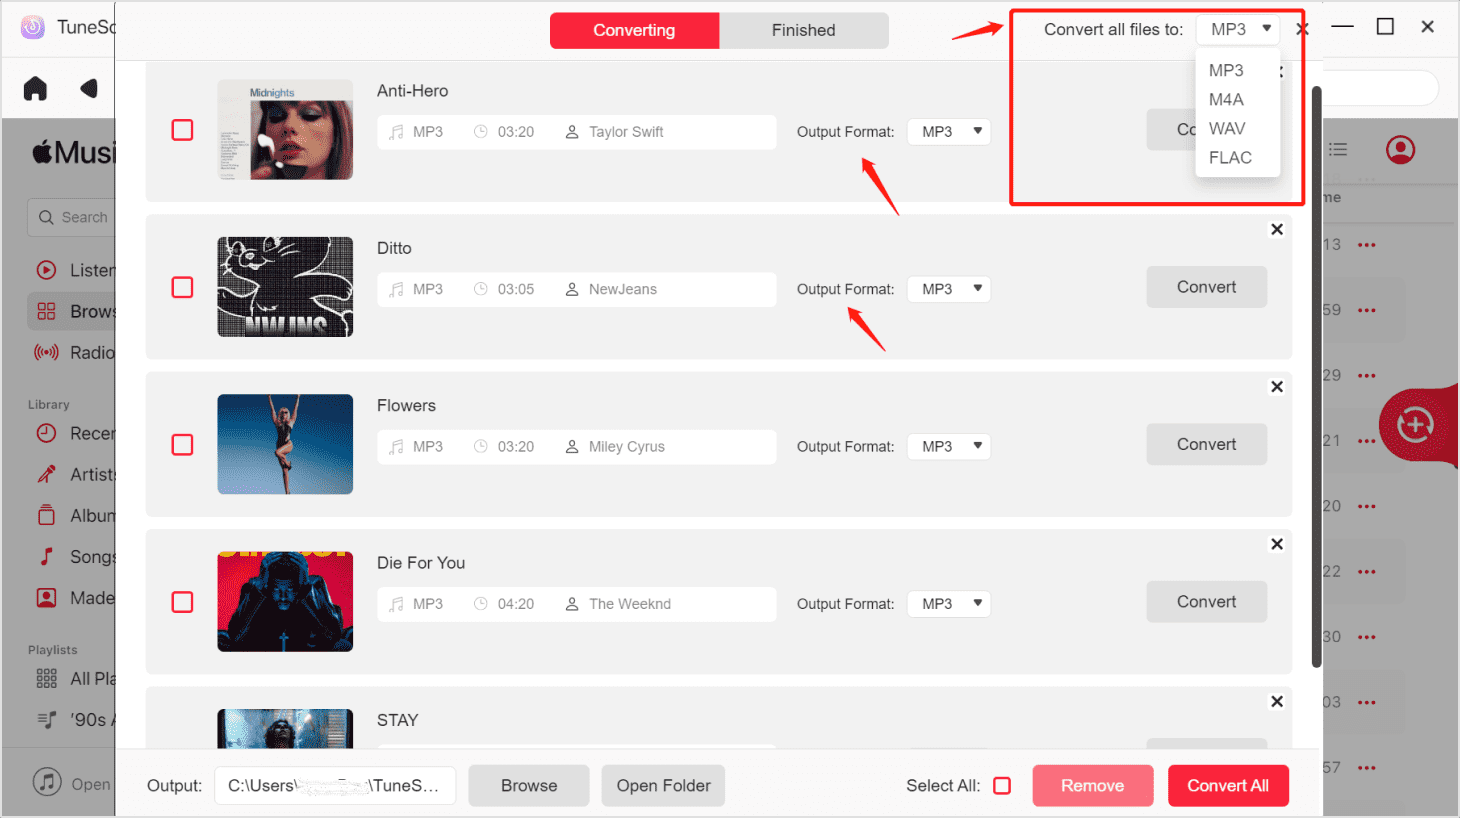
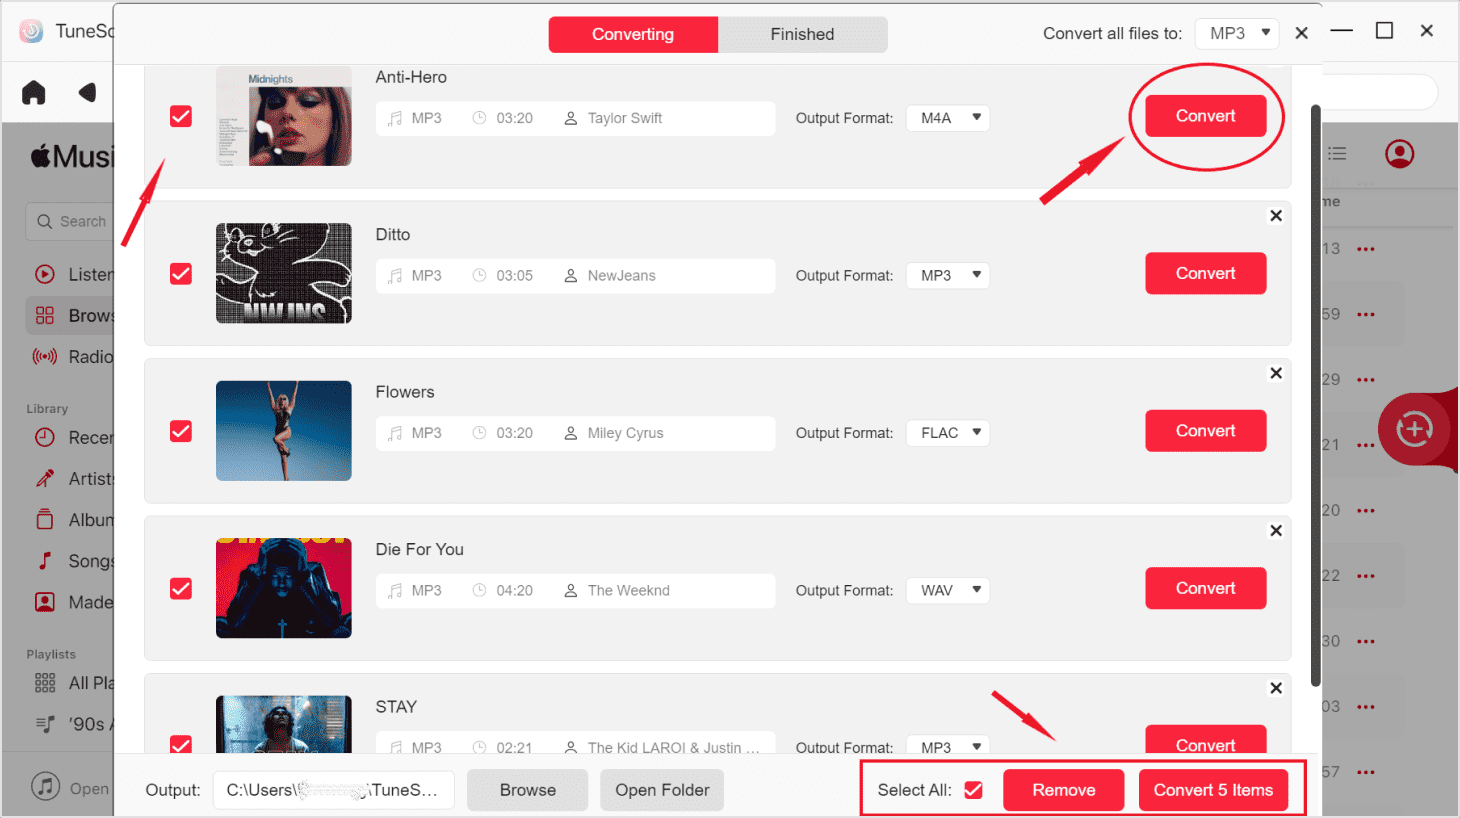
Step 3. Convert iTunes Playlist
Click on the Convert button to start converting the iTunes playlist songs that you selected. Now all you have to do is to wait until it’s over.
Step 4. Transfer iTunes Playlist to iPhone
Your last step is to connect your iPhone to the computer. Once connected, drag the files that you downloaded with TuneSolo and drop them into the iPhone’s internal storage.
Part 4. Summary
iTunes has already been abandoned for a long time. Hence, there are many bugs in the program. That is why it’s suggested that you sync iTunes playlist to iPhone as soon as possible to avoid any potential problems.
With this guide, it should be an easy task for you. Plus, you have learned not only how to sync, but also to transfer your iTunes playlist to your iPhone. This should be more than enough to make things easier for you.

