How To Transfer iTunes Playlist To Android Device
Transferring iTunes music to Apple devices is easy but transferring them into a non-Apple device such as Android has always been hard ever since. So, users have been looking for simple but reliable ways on how to transfer iTunes playlist to Android so that they wouldn’t have the need to buy them again and be able to enjoy them on Android devices.
This post will share the most recommended ways that you may utilize how to transfer iTunes playlist to Android. Make sure to select and use the method that will help you the best.
Article Content Part 1. Can You Transfer iTunes Playlist To Android?Part 2. How Do You Transfer iTunes Playlist To Android?Part 3. The Best Way To Transfer iTunes Playlist To AndroidPart 4. Conclusion
Part 1. Can You Transfer iTunes Playlist To Android?
The question “Can you transfer iTunes playlist to Android” is a common question asked by the users. For those who have been wondering, yes, this procedure is possible. In the next part of this article, the possible methods that you can utilize in doing the procedure of how to transfer iTunes playlist to Android will be explained.
Knowing that there is a possible way on how to transfer the iTunes playlist to Android is very great news especially if you already saved a lot of tracks and playlists from iTunes. If you are planning to use another type of device like Android phones, it could be of great help since you won’t have the need to purchase the songs again from other music providers.
All Apple users must know already that the songs purchased from iTunes and Apple Music could only be played and enjoyed using Apple devices. So, there is no such direct way of transferring the songs into a non-Apple device. The contents are DRM protected which makes it difficult for you to transfer or move them into another. You will be in need to use another method or professional tool to be capable of doing so.
Part 2. How Do You Transfer iTunes Playlist To Android?
If you are using iTunes for quite a long time now and finally decided to switch to using an Android device in streaming music, it is really a pain if you will just leave all the music files behind that you have saved and curated all this time. Using an Android device could be easier for you if you would know how to transfer iTunes playlist to Android. Before, being able to play and listen to iTunes playlist on Android is nearly impossible, but now, there were a lot of methods that are already introduced enabling people to stream them on Android.
I have listed below the two most recommended methods that you may utilize in doing the procedure of how to transfer the iTunes playlist to Android.
Method 1: Manual Way Of Transferring Of Files (Drag And Drop)
The easiest method that you may utilize in doing the procedure about how to transfer iTunes playlist to Android is the manual way or the dragging and dropping of songs from the original location into the intended end location. This would be the most effective especially if you only have a few tracks to transfer. This method will also not require you any third-party applications in order to proceed. All you have to prepare is your Android phone, Window Files Explorer, and a USB cable.
See the detailed steps listed below and learn how to transfer iTunes playlist to Android.
- The first step is to have your Android phone and computer connected with each other using the USB cable that you have prepared a while ago.
- After that, you will have to choose where to use your device for. From the options shown on your screen, click “Transfer files (MTP)”.
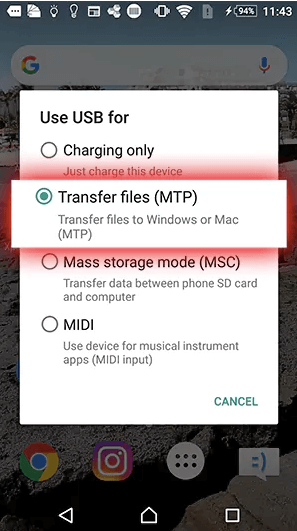
- Now, you have to head into the File Explorer and click the music folder of your Android device.
- After doing so, another File Explorer window should be opened so that you can navigate into your iTunes music.
- For the last step, all you have to do is to do the manual way of transferring the music files which is to drag and drop them from your iTunes music collection/library into your Android phone’s music folder, respectively.
Note: All of your iTunes music files are originally set to be found by clicking on your username (This PC) and then the Music button to iTunes to iTunes Media and then Music.
The dragging and dropping of files are also applicable to an entire artist folder. If you wish to drag an entire folder, you can do so. In addition to this, another way on how to transfer iTunes playlist to Android, you may also try to select all the tracks that you wish to transfer from your iTunes music folder and then right-click and select Copy. After that, navigate to the Windows File Explorer window and tap the music folder on your Android device and then right-click and select Paste. In just a single click, all of the music files will now be transferred to your Android phone and you will be able to enjoy them now using the new location.
Method 2: Through Google Play Music
The next method that can help you with how to transfer iTunes playlist to the Android procedure is through the features of Google Play Music. This method would be the most advisable for those who are more into using a lot of devices in accessing their favorite tracks and for those who wish to save more device storage in their Android phones. This is because you are allowed to save and upload up to 50,000 songs in Google Play Music. With this big number of total tracks allowed, you can surely create an extensive music collection of your own.
If the tracks are already uploaded, this is when you will be able to stream them using multiple devices as long as you are signed in on the service. So basically, you won’t have the need anymore to save the songs on your used device. However, you will be in need of an internet connection, which could be a WIFI or cellular data if you are to play the uploaded songs or else, you won’t be able to. If you are using data, you have to monitor the quantity of music that you are to stream since it will surely cost you more if you wish to stream more.
Check out the simple steps below on how to transfer iTunes playlist to Android with Google Play Music.
- The first thing that you have to do is to open your web browser and search for Google Play Store.
- The next step is to have the button of Music clicked, which is to be followed by clicking the My Music button and then Add Your Music button.
- In order to proceed, you will be in need of a browser extension. So, if you do not have it yet, you will have to install it first.
- Right after that, go back to your browser with Google Play Music opened in it and then tap on Add My Music.
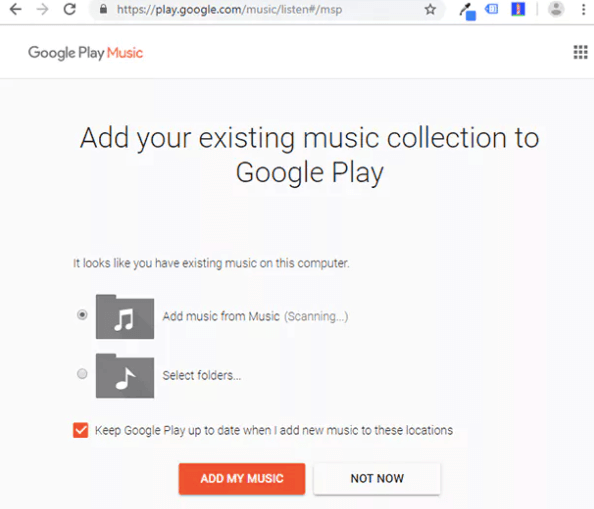
- After doing so, a new window will show up. From here you have to click the button saying Select from Your Computer which will direct you to your iTunes Media folder.
- From the mentioned folder you may start selecting each song that you wish to upload to Google Play Music. To upload, just tap on the Open button so that you can proceed to upload. Another way to upload the tracks is by dragging and dropping the songs from the music folder into the window.
Method 3: Using Apple Music
Another recommended way of transferring the music files into an Android device is through Apple Music. It happens that Apple Music has created and designed a separate version of its application for Android devices. Meaning to say, you can just download the Apple Music app version on your Android phone by searching for it in your Play store. After downloading and installing the application, you may start syncing your iTunes playlist into your Apple Music app. Once the process is already complete, you may now be able to access them on your Android device.
See the steps below on how to transfer iTunes playlist to Android through the help of the Apple Music application.
- On your used computer, proceed to your iTunes application and have it opened.
- After opening the app, look for the Edit tab from the toolbar above. Once found, click on it.
- Clicking the Edit tab will give you a set of options wherein you have to click on Preferences.
- Now, from the General tab of iTunes Preferences, click on “iCloud music library” and check if it has been turned on. Once done checking, tap on the OK button that you see on your screen.
- After doing so, you will have to wait for a couple of minutes until the iTunes playlists have been completely synced in your iCloud. Take note that iTunes does not provide the users a progress bar, so you will not be able to see how much time is left for waiting. So, patience is also a requirement in doing this step.
- If the syncing process is already done, you may now open the Apple Music app that you installed and locate the Library tab. This is where all the synced playlists and tracks could be found.
Part 3. The Best Way To Transfer iTunes Playlist To Android
Aside from the methods that are discussed above, there is actually another method that can help you with how to transfer the iTunes playlist to the Android procedure without experiencing any limitations or restrictions while executing the process. This application is named TuneSolo Apple Music Converter.
TuneSolo Apple Music Converter is very capable of converting your iTunes playlist into another audio format and then downloading them into your used device. Once the tracks are saved, you can now copy or transfer them from one device to another enabling the users to stream them on multiple devices. Another good thing about this is that you could expect the best audio quality of the songs converted.
To know more about the TuneSolo Apple Music Converter and how it can help you with how to transfer iTunes playlist to Android procedure, a brief discussion of its features is written below.
Key Features Of TuneSolo Apple Music Converter
- Converts Apple Music, iTunes M4P Music, and audiobooks into plain output formats including MP3, WAV, AAC, and FLAC.
- The converted songs could be downloaded to your device through the help of the download feature offered by TuneSolo.
- The converted songs could be played offline as well and you may use any device of your choice in playing them.
- TuneSolo Apple Music Converter can guarantee you converted songs with the best streaming quality.
- All of the important details such as the ID3 tags and Metadata info of songs could also be preserved after the conversion process through the help of the advanced identification technology utilized by TuneSolo.
- Lastly, you can surely have the converted songs in just a few minutes after clicking the Convert button. It can work at up to 16x the faster speed of conversion.
How To Convert iTunes Playlist Using TuneSolo Apple Music Converter
The list of steps below will explain to you how to convert the songs into another output format and download them in your device after. Later on, the procedure on how to transfer iTunes playlist to Android will be included as well.
Step 1. Have TuneSolo Apple Music Converter Downloaded In Your Device
For the first step, you have to get the application first and install it on your used device. To do this, just open your browser and navigate to the official website of TuneSolo. From the site, download the application of TuneSolo Apple Music Converter and install it right after.
Step 2. Transfer iTunes Playlists To TuneSolo Apple Music Converter
The next step would be the uploading of iTunes playlists into the music converter. Before finally proceeding into the uploading of songs, the tracks and playlists should be read first by TuneSolo, so, you will have to wait for a couple of minutes until TuneSolo has already loaded the tracks and playlists.
Once they have shown up, you may now start uploading them by copying the link and pasting them into the music converter. Alternatively, you can just drag and drop the tracks into the converter.

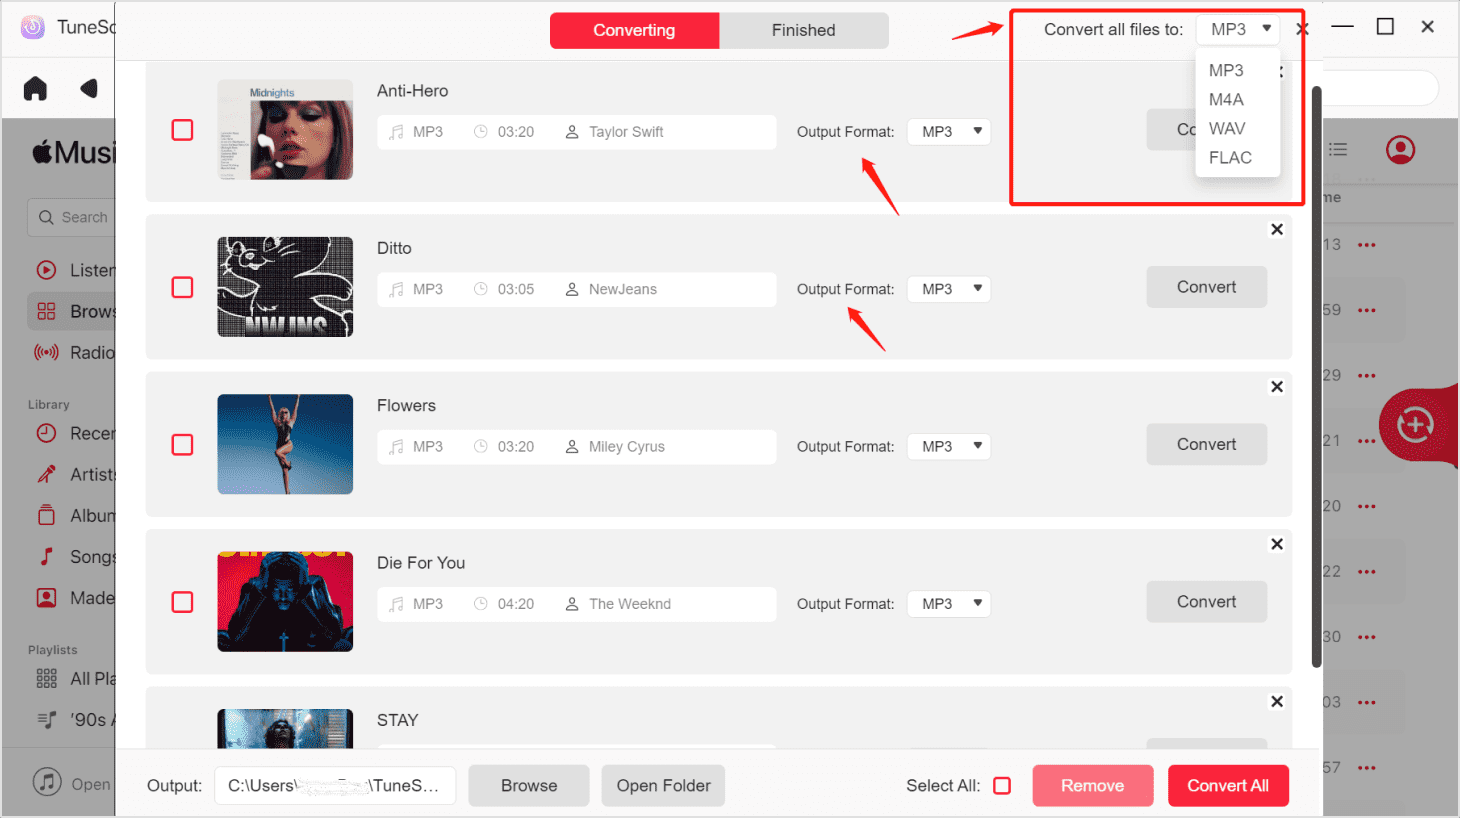
Step 3. Select The End Format Of The iTunes Playlists And Tracks
After the successful uploading of the tracks, you may now proceed to choose the end format of them. From MP3, WAV, AAC, and FLAC, select one that you wish to have the most. After the output format selection, you will also have the need to allot an output folder for the songs that are to be converted.
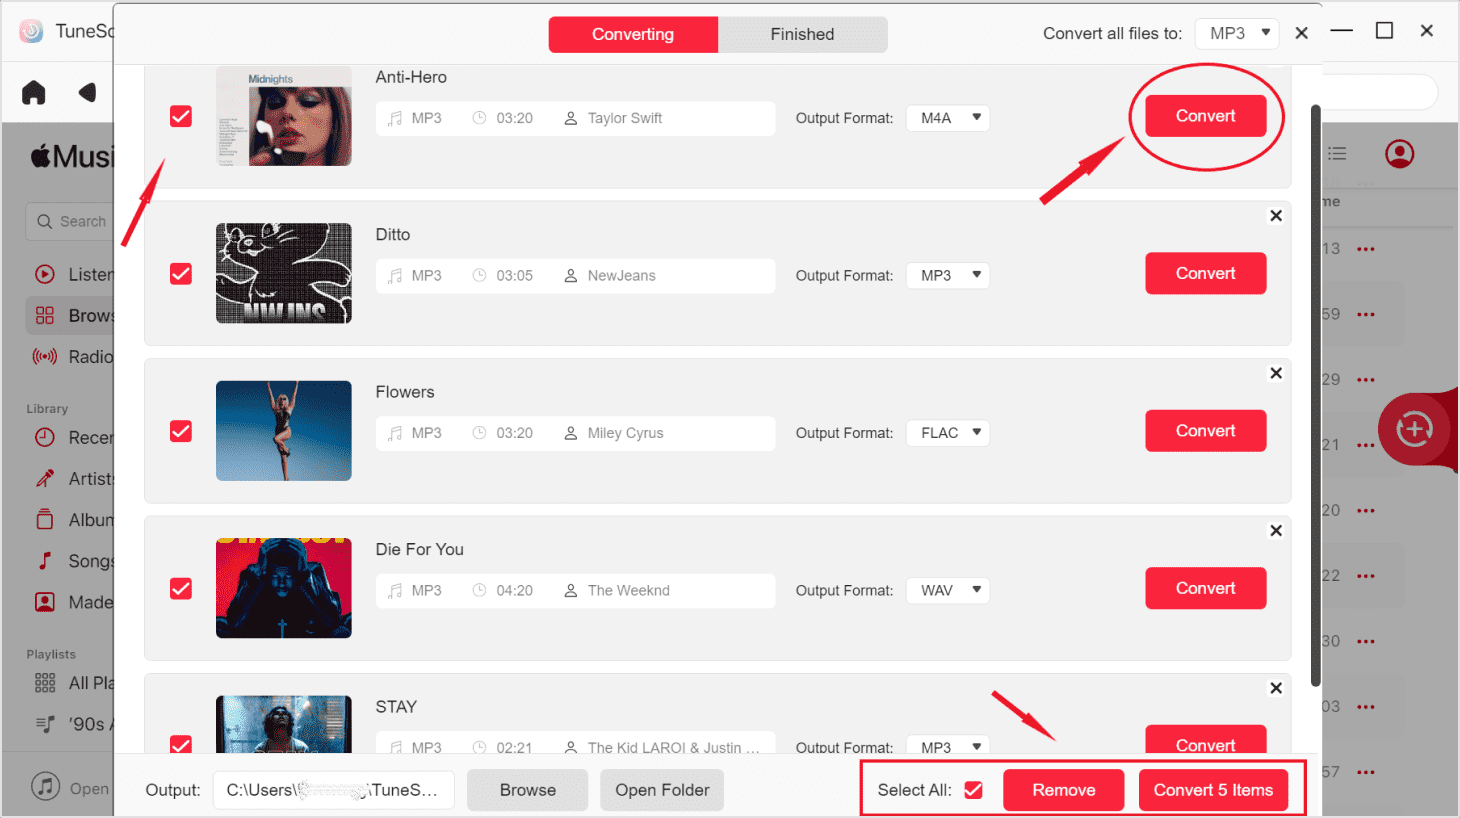
Step 4. Hit The Convert Button
Lastly, to officially have the conversion process started, you just have to hit the Convert button and after a few minutes, you can already have the songs converted into your selected format. After that, you may now save them in your device and transfer them from one device to another, such as your Android phone.
How To Transfer The Converted iTunes Playlist To Android
Now that you finally have the converted tracks and playlists saved on your computer, how to transfer iTunes playlist to Android? This procedure could simply be done through the use of a USB cable. With the help of the cable, connect your Android phone to your computer and copy and paste the songs into the music folder of your Android phone.
Another way is through the manual way of dragging and dropping the songs and playlists from the initial location into the final storage, respectively.
Part 4. Conclusion
With the methods that were discussed, you should know by now how to transfer iTunes playlist to Android. Each of the methods discussed has its own advantage and disadvantage. So, you better choose which would suit the best with your needs. As a short summary let us have the simple difference between them. If you are in need of a basic music file transfer, like a single-track transfer or batch transfer, you may use the manual way of transferring or dragging and dropping the files.
On the other hand, if you are having problems with your device’s storage space, you may utilize Google Play Music and upload the songs in the cloud. Lastly, if you wish to keep the songs on your Android device forever, you may use TuneSolo Apple Music Converter and get all the tracks that you wish to have. Once the songs are downloaded, it will be easier for you now to do the procedure of how to transfer iTunes playlist to Android or on any device that you are to use in the future.

