Two Recommended Methods On How To Add Spotify To Instagram Story
Adding a current day story has become one of the most exciting and interesting features of social media applications such as Facebook, Instagram, Snapchat, WhatsApp, and more. These added stories of yours could be seen by your friends within the time frame of 24 hours alone. Once an entire day has passed, these stories will automatically disappear from your feed. Adding images and videos were already good enough but it would be more interesting if there is a background music on it, right? So, is there a possible way on how to add Spotify to Instagram story? Spotify Music being mentioned has been one of the most reliable and established music providers up to this day.
At the end of this article, expect that you will be learning the two recommended methods on how to add Spotify to Instagram stories. The first one is through Instagram, itself and the other one is through the help of a reliable third-party application. Check out the easiest ways on how to add Spotify to Instagram story.

Article Content Part 1. How To Add Spotify To Instagram Story?Part 2. The Best Way To Add Spotify To Instagram StoryPart 3. Conclusion
Part 1. How To Add Spotify To Instagram Story?
In case you do not have an idea, the Instagram application installed in your device has the capability to capture and extract audio from your mobile phone. So, let us say that you are currently playing a song or playlist either from Spotify, Google Music, iTunes, or any music streaming application you have, Instagram could directly extract the sound from the streaming application.
To easily do the procedure on how to add Spotify to Instagram story, you can simply play a certain track or album from Spotify while creating your Instagram video story. To understand more about this procedure, listed below are the detailed steps on how to add Spotify to Instagram's story using Instagram.
- The first step is to proceed to your Spotify application. Open it and select a certain song that you wish to utilize for your Instagram story.
- You can make use of the time bar in selecting a certain part of the track that would be best suited for your Instagram story. Once you found the perfect part, pause or stop the song from playing.
- After doing so, proceed to open your Instagram application and then click the icon of the camera at the upper left part of your screen. This symbolizes that you will be creating a new Instagram story.
- Right after that, have your selected Spotify song played. While the song is playing in the background, simultaneously click and hold the shutter button in order to capture the song while you are creating a new story.
- The last step would be the uploading of your newly created Instagram story. In order to do this, just click on the “+” button that is found at the bottom part of your screen. Clicking on this will have your story automatically uploaded to your account.
The discussed method of how to add Spotify to Instagram story via Instagram application is actually the easiest way that you could utilize. However, if you are looking for the perfect story and for the perfect sound, this method may not be that advisable to use. This is because there would be high chance of capturing other sounds or noise in your background. The sound quality could not be guaranteed the best as well.
So, if you are looking forward to having the best audio quality for your background music, you can make use of a third-party application in downloading the Spotify tracks.
Part 2. The Best Way To Add Spotify To Instagram Story
Aside from the direct method which is by Instagram, itself, the best alternative way that I could recommend on how to add Spotify to Instagram story is through the use of a third-party application that can help you download your desired tracks first as a local file and then be able to upload it as background music on your story.
You might be thinking why do you have to go through the hard way, where in fact, this would be the easiest way since Spotify Music contents are protected by DRM and there is no possible way that you can directly save them in your device. What you have to do is to save the songs on your device and then make use of a reliable video editor. Knowing these basic steps will give you the capability to proceed with how to add Spotify to the Instagram story procedure. This reliable third-party app that I am talking about is TuneSolo Spotify Music Converter. This music converter is very capable of removing the DRM protection from Spotify contents and converting them into compatible output formats. Right after the conversion process, it will then assist you in downloading them to your device as local files.
Listed below are the main features that we could get from using TuneSolo Spotify Music Converter. The discussion of features is to be followed by the steps on how to officially get the tracks and keep them on your device in order to be capable of doing the procedure of how to add Spotify to Instagram story.
Star Features Of TuneSolo Spotify Music Converter
Download Spotify Music
One of the key features of TuneSolo Spotify Music Converter is its capability to download the Spotify tracks after they are converted into another output format. You can name all the tracks that you wish to have and TuneSolo can help you get them all.
Convert Spotify Music
The Spotify contents are not downloadable by nature. This is because they are encrypted by DRM whose aim is to prevent the contents from being copied into another device. TuneSolo Spotify Music Converter is capable of removing this copy protection which will then enable it to convert the songs into other output formats. The formats available in TuneSolo include the MP3 format, AAC, FLAC, and WAV.
Offline Playback
Once the songs are converted and downloaded in your device, you will now be able to play them anytime you want even without an internet connection. You can now be able to bring your music with you anywhere you go.
Best Streaming Quality Of Songs
All of the songs produced by TuneSolo Spotify Music Converter are guaranteed to have the best streaming quality. The resulting audio quality of the converted tracks is just the same with the original quality.
Fast Speed Of Conversion
Another good thing about TuneSolo Spotify Music Converter is that it will not let you wait for a long time to finish. It can incredibly work in up to 5x speed faster which is a lot way quicker than any normal speed of conversion. With TuneSolo, you can literally save a lot of your time from waiting.
Use Multiple Devices In Playing The Converted Songs
All of the output formats that are mentioned available a while ago are playable in many devices. If the Spotify tracks you selected are converted into any of the formats mentioned, you will be able to use any device of your choice in streaming the converted tracks and playlists.
Organization Of Output Music Library
TuneSolo Spotify Music Converter has allowed the users to arrange their music files in a way they prefer them to be. Meaning to say, you can have the music files arranged in whatever category you think will enable you to locate the files in the fastest way possible. You can have them arranged by year, by genre, by album, by artist or by any category you wish to have.
Preserves ID3 Tags And Metadata Info
TuneSolo Spotify Music Converter is equipped with identification technology that enables it to preserve all the important details from the tracks. These details are the ID3 tags and Metadata info of songs which include the artwork, album’s title, artist name, year of release, and more. Even after the conversion process, TuneSolo was able to preserve these details from the songs.
Free Updates And Help From The Technical Support Team
All the users of TuneSolo Spotify Music Converter are entitled to free updates whenever there is one available and newly released. You can have your application updates for free for lifetime as long as you still have the application installed on your device. Also, you can always ask for the help of the technical support team in case you encounter a problem in the middle of the process.
How To Convert Spotify Music To MP3 Using TuneSolo Spotify Music Converter
Step 1. Download And Launch TuneSolo Spotify Music Converter
The first step that you must do is to get the TuneSolo app. In order to do this, you may visit the official website of TuneSolo and get the application from there or you may search the TuneSolo application in your device’s application store. Once seen in the results, click on it and install. Right after the complete installation of the app, you have to launch and run it as well.
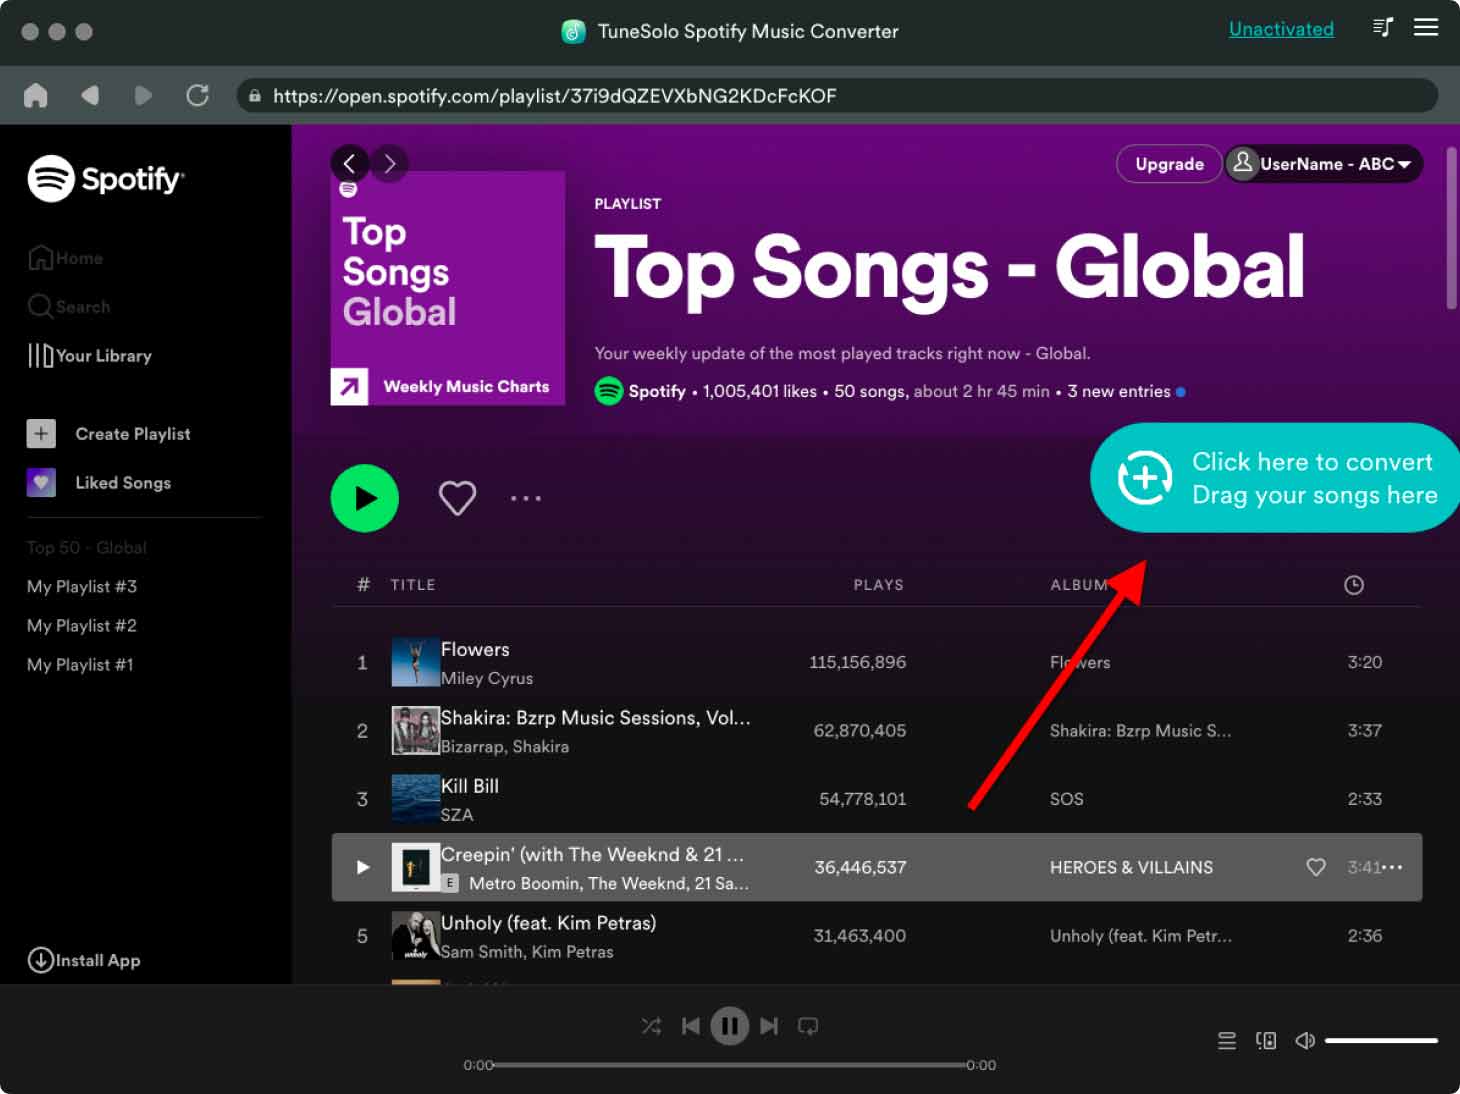
Step 2. Upload The Music Files Into TuneSolo Spotify Music Converter
After the successful installation and launching of the TuneSolo app, you need to wait for a few minutes until the app has completely read your music library. Once done, it will automatically load your songs and playlists a few seconds after. Then after that, you may now start uploading the songs. To make this possible, you may copy the song link and then paste it into the converter. Another way to upload the songs is to drag the music files from your library and then drag them into the music converter.
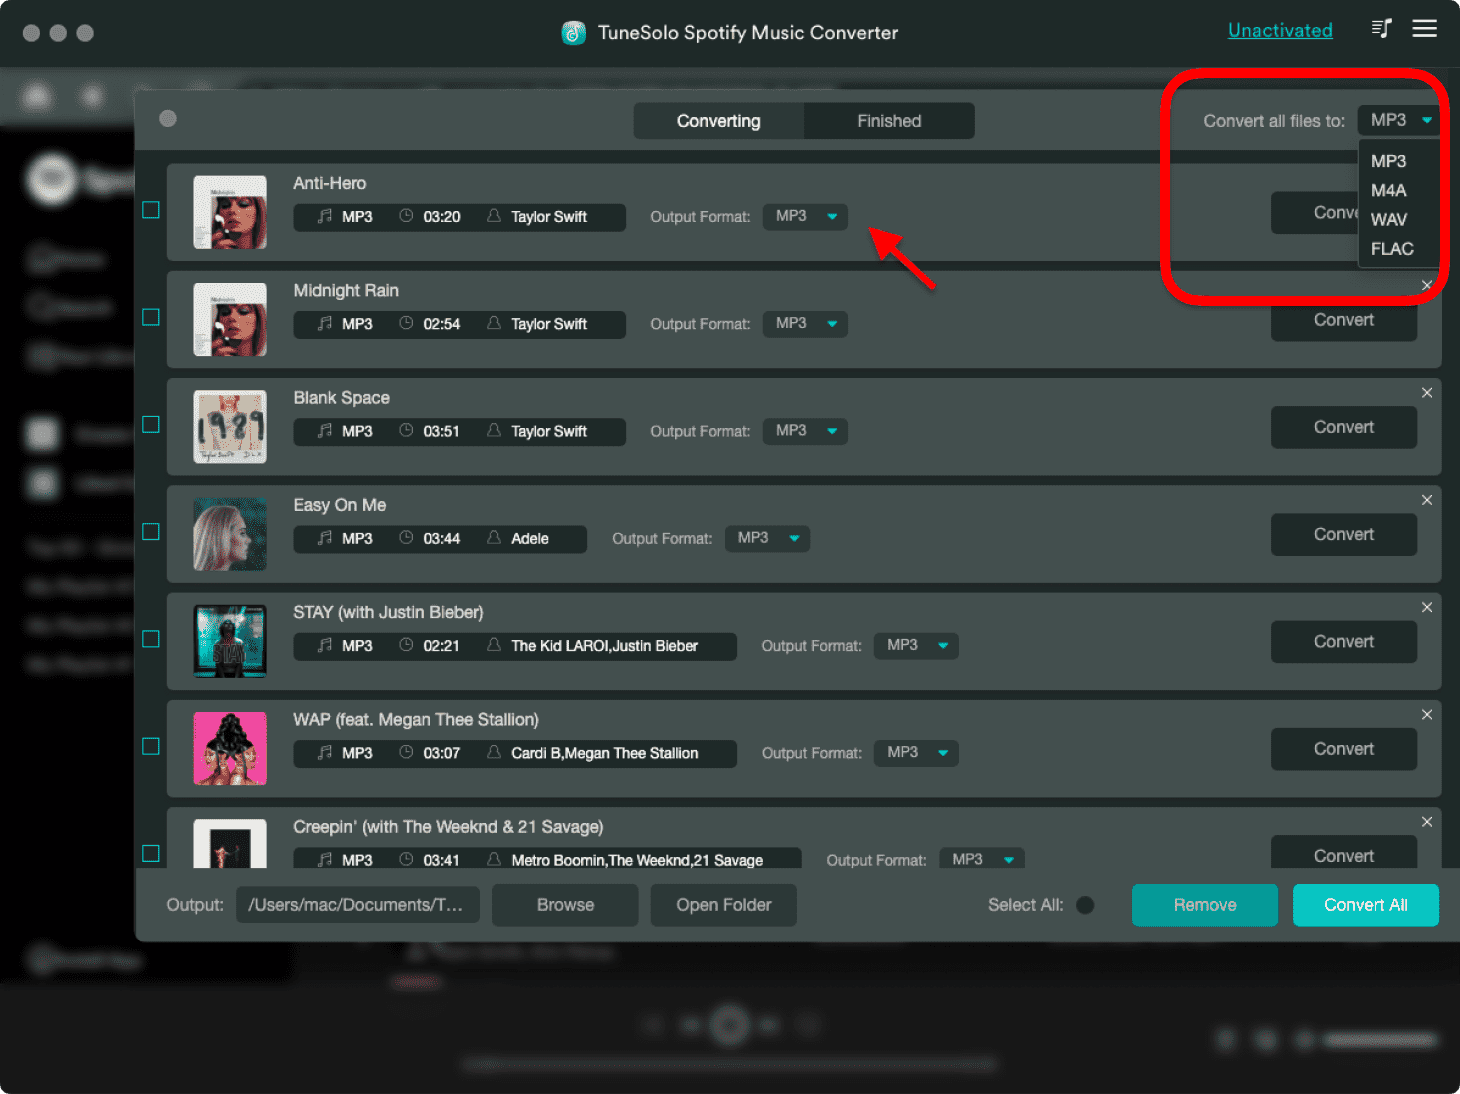
Step 3. Choose The Output Format Of Songs
After the successful uploading of songs and playlists, start on choosing the output format. From the set of formats mentioned available a while ago, click MP3 format. You have to allot an output folder as well for the storage of the converted music files.
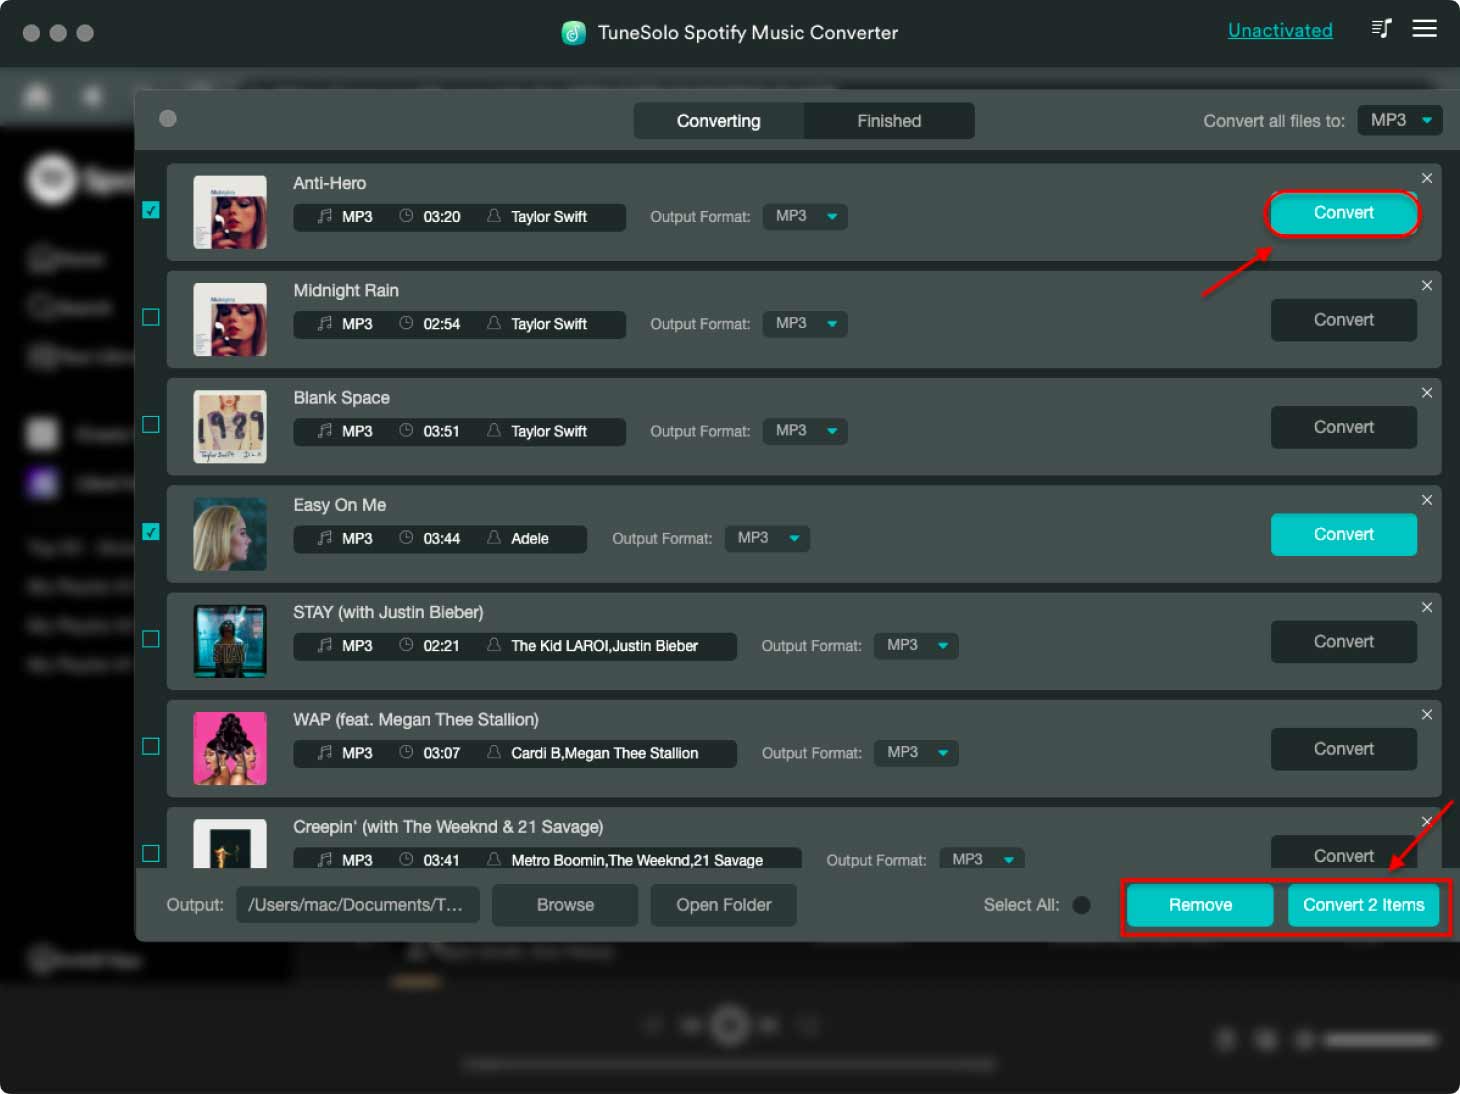
Step 4. Click “Convert All” Button
Now that you already had everything set, starting from the uploading of songs down to the output format selection, you may now proceed to click the “Convert All” button. Hitting on this button will automatically have the conversion process started.
Step 5. Get The Converted Songs
Wait for a couple of minutes until the conversion process was done. Once the process is finished, you may now be able to get the converted songs by clicking the “View Output File” section. By downloading the converted songs, it means that you can keep them on your device forever.
Add The Converted Spotify Songs In Instagram Story With The Help Of InShot Video Editor
- After saving the converted Spotify songs in your computer, have your desired track be transferred into your mobile device, which could be an Android or iOS device.
- From InShot Video editor application, open the video that you wish to add on your Instagram story.
- You may also trim or adjust the video based on what you prefer to have.
- After doing so, take a look at your toolbar and locate the option or button of Music. Once found, hit on it and start selecting the converted Spotify track that you wish to utilize in your Instagram story.
- If you have successfully added the music into the video, you may now start saving the resulting video and upload it on your Instagram as a new story.
So, to summarize, how to add Spotify to Instagram story? Convert the tracks, save them as local files on your computer, upload to video editor application, save the edited video and then lastly, upload it to Instagram as a new story.
Part 3. Conclusion
Stories on Instagram should not be limited alone with quick snaps and images. This may be the reason why Instagram has allowed the users to share some of their videos as their current day story. But these Instagram video stories could be plain enough if it is just a video and is without any music in the background. In this case, the procedure on how to add Spotify to Instagram story was made and is discussed in the previous sections earlier. To make it possible for you to proceed with how to add Spotify to Instagram story procedure, using TuneSolo Spotify Music Converter would be very much needed. Through the help of the discussion above, make sure to utilize its features properly and be able to create your own Instagram video story with music on it.

