A Simple Guide to Follow to Create Ringtone in iTunes
iTunes is definitely a powerful platform wherein people can purchase licensed songs, albums, and playlists that they can stream and enjoy while doing anything or even traveling to faraway places (office, travel locations, school, etc.). Most iTunes users are surely aware of the many perks that can be enjoyed from using the iTunes application. And, one of those is to be able to use good tracks as ringtones!
As we go along with this post, we will be dealing with this topic – “how to create ringtone in iTunes?”. Surely, those users who are really into iTunes music are excited to find ways on how they can use those tracks as ringtones and hear those tracks every time when their phones ring or notifications are displayed.
Article Content Part 1. Where Are My Ringtones in iTunes?Part 2. How to Create Ringtone in iTunes for Free?Part 3. Bonus: Save Ringtone Forever on Your Own DevicePart 4. The Summary
Part 1. Where Are My Ringtones in iTunes?
One good thing about the iTunes application is that it allows its users to enjoy the ability to manage or create a custom ringtone for their iPhones. Unfortunately, as the app advances, this feature has been removed. This is why you won’t be able to check this out if you are using the iTunes 12.7 version. Thus, one can no longer manage their ringtones via the iTunes application.
So, if you are using an iTunes app in a lower version (lower than the 12.7 version), in the first part of this article, we will be giving you a simple guide on how you can find ringtones in iTunes. This portion won’t be about how to create ringtone in iTunes but how to find those in case you are using a lower version.
So, here is what you need to do. The steps would vary depending on the computer you are making use of. Nevertheless, we have the procedures available here for both Mac and Windows computers’ users so there is nothing to worry about.
Where are My Ringtones in iTunes on Windows Personal Computer?
To find out, here are three easy steps that must be followed.
Step #1. Launch the File Explorer
Launch your file explorer and immediately head to the “Computer” option.
Step #2. Head to “Local Disk”
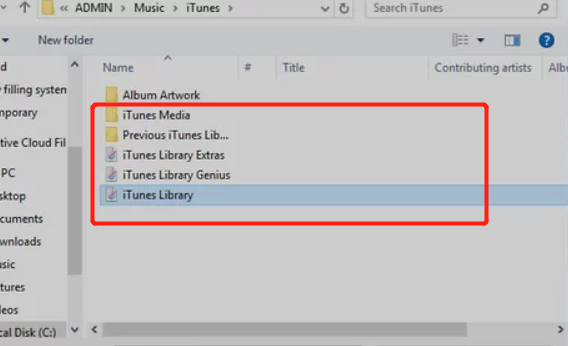
You will be seeing some storage locations. You need to make sure that you will head to the “Local Disk” option, followed by “Users”, “The name you are using”, “Music”, then “iTunes”, and finally “iTunes Media”.
Step #3. Head to “iTunes Media” Folder
You will now see all those iTunes ringtones here – on your “iTunes Media” folder.
Where are My Ringtones in iTunes on Mac Personal Computer?
In case you are using a Mac personal computer, this is how you can find your ringtones in iTunes.
Step #1. Open the Finder Window
Open your finder window and hit the “Go” button followed by ticking the “Home” option.
Step #2. Double Click the “Music” Button
Do the double-clicking of the “Music” button to see all the music that is stored on your Mac computer.
Step #3. Open the “iTunes” Folder
Finally, make sure that you will open your “iTunes” folder next to see all those iTunes files that you have.
Tip: There is another easy option that you can do using your iPhone. You just need to simply open the iTunes app, ensure that the iPhone you are to use is connected, and begin clicking the drop-down menu in the left portion of the iTunes app page. By doing so, you will immediately see all the iTunes ringtones. However, this won’t work in case your agenda would include the moving of your iTunes ringtones or files from the library or even create backup files.
What if you are using the 12.7 or later version of the iTunes app? What would then be the answer to this query - how to create ringtone in iTunes? Can you still find a way on how to create ringtone in iTunes to avoid the use of the usual and boring available default iPhone ringtones?
Of course, we got you! To answer the above questions, continue reading the second part of this article.
Part 2. How to Create Ringtone in iTunes for Free?
The procedure of how to create ringtone in iTunes is totally easy and quite simple. By ensuring that you will follow the below guide, you can surely enjoy the ringtones created after the whole process. We will be doing the explanation by dividing this portion into two: create ringtone in iTunes and make sure the ringtone is placed on your iPhone successfully.
So, what else are you waiting for? Start by doing the first step under the first part.
Create Ringtone in iTunes
Step #1. Open and Launch iTunes App
Of course, the first thing that you need to do is to open and launch your iTunes application. If there is a need to do the updating of the app, do it by simply heading to the app store.
Step #2. Add Music Files
You need to ensure that the song you wish to use as a ringtone is on your iTunes app already. In case you do not have the file yet, you can add the track by using the “Add File to Library” option.
Step #3. Trim the Song
Now, choose the section or portion of the iTunes song that you want to use. You can trim the song up to 40 seconds. The max. length that you can use is up to 40 seconds.
Step #4. Open the Information Menu
Once done with step 3, you need to open the information menu of the song. Do it by clicking the song, hit the “Edit” button (for Windows computer), or the “File” option (if you are using Mac), and choose the “Song Info” tab (for Windows) or “Get Info” (for Mac). After doing so, a new window will open.
Step #5. Head to “Options”
Hit the “Options” button.
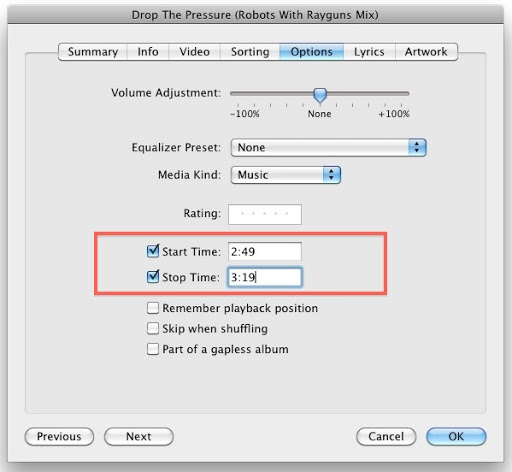
Step #6. Tick “Start” and “Stop”
Ensure that you will be ticking the checkboxes for the “Start” and “Stop” of each track.
Step #7. Enter the Specific Times for Start and End
Remember the start and end time of the portion you chose in step 3. In this step, you need to enter the specific times for both – start and end.
Step #8. Save the Changes
Now, you need to tick the “OK” button that is located at the bottom portion of the page. By doing so, the changes you made will be saved and you will then exit the information menu.
Step #9. Convert the iTunes Song to AAC
You need to change the iTunes song to AAC file format. You can do it by creating an AAC version of the file.
Step #10. Head to the File’s Location
Now that you completed the 9th step, you must head to the file’s location to choose the AAC version of the iTunes track.
Step #11. Convert the AAC File to M4R
Finally, you need to change the AAC file to M4R format. The process will differ if you are using a Mac or a Windows computer. (And if you want to transfer your AAC files to MP3 directly, you can get more details from us.)
Now that you know how to create ringtone in iTunes, you may now proceed to place the ringtone created on your iPhone. We can give you instructions if you want to place your Apple Music songs on an SD card directly.
The Process of Placing the Ringtone on Your iPhone
Step #1. Connect iPhone to Computer
The first thing that you need to perform is to make sure that your iPhone is connected to your computer. You can use a USB cable to do so.
Step #2. Look for iPhone’s Icon
On your iTunes application, look for your iPhone’s icon. You will find this on the left page of the screen.
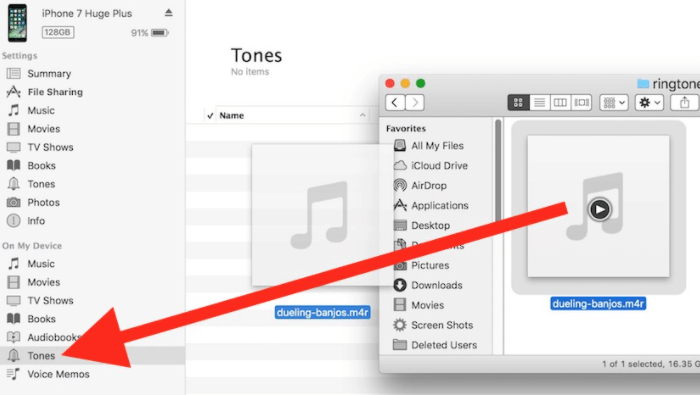
Step #3. Head to “On My Device”
Click the “Tones” button. This is a button that you will see under the “On My Device” option.
Step #4. Drag the M4R Version into the Platform
This is when you will be adding the ringtone created previously. You can do this by dragging the M4R version into the platform.
Step #5. Sync the File
Once you saw the file already, make sure to click the “Sync” button. This will only take some time. After completion, you can now remove your iPhone.
Finally, to set the ringtone, simply head to your “Settings” button and look for the “Sounds” menu. Under the “Sounds and Haptics”, tap the “Ringtone” option and choose the song you previously created. You can even use a specific ringtone for each contact that you have if you want to.
Apart from knowing this, we have another bonus information for you that you can check out in the third part of this post.
Part 3. Bonus: Save Ringtone Forever on Your Own Device
You have another easy way to create ringtone in iTunes and place the ringtone on your phone. And, that is by using a tool – the TuneSolo Apple Music Converter. Since the iTunes files are protected files (DRM protected), it is quite difficult to keep the tracks forever. So, you need the help of an application that can remove this protection and at the same time help you save the iTunes songs as ringtones on your iPhone forever which means that even if your subscription ended, you can still use the tracks.
Here are the things you can enjoy from using the iTunes application.
- The removal of the DRM protection of the iTunes files.
- You can do the conversion of iTunes or Apple Music songs or even audiobooks using this tool.
- You can be assured that even after the conversion process, the outputs are of high quality.
- Both the conversion and downloading processes are fast.
- This tool can accommodate the multiple processing of the files.
- There are only a few things that you need to complete before installation.
- The steps needed to do in order to complete the conversion process are too easy to do and follow.
If you wish to try this out, you just need to keep in mind that keeping both your iTunes and Apple Music apps closed will ensure that the conversion process will be a success using this app.
Here is an overview of the steps that you need to accomplish.
- Open the TuneSolo Apple Music Converter and begin.
- Import or upload the iTunes songs chosen to be ringtones for your iPhone.
- Finally, tick the “Convert” button at the bottom.
Though the above three steps are simple, we still have the details here for your reference in case needed.
Step #1. Open the TuneSolo Apple Music Converter and Begin
You need to firstly install the TuneSolo Apple Music Converter on your PC. This is supported by both Windows and Mac computers. You just need to ensure that all those requirements will be completed and accomplished, and you will be able to proceed with the installation easily. If you wish to know more information about the installation process, you can immediately go to the main website of this application.
Step #2. Import or Upload the iTunes Songs Chosen to be Ringtones for your iPhone
Once you are on the main page, you can now add and upload the iTunes songs that you wish to use as ringtones on your iPhone. If you want to process multiple tracks, you can do it.
Upon uploading, simply choose the output format that is suitable on your iPhone and set the settings that you want when it comes to the bit rate, sample rate, and more. Also, it is recommended to set a defined output path to ensure that you will immediately access the converted files once the process is done.

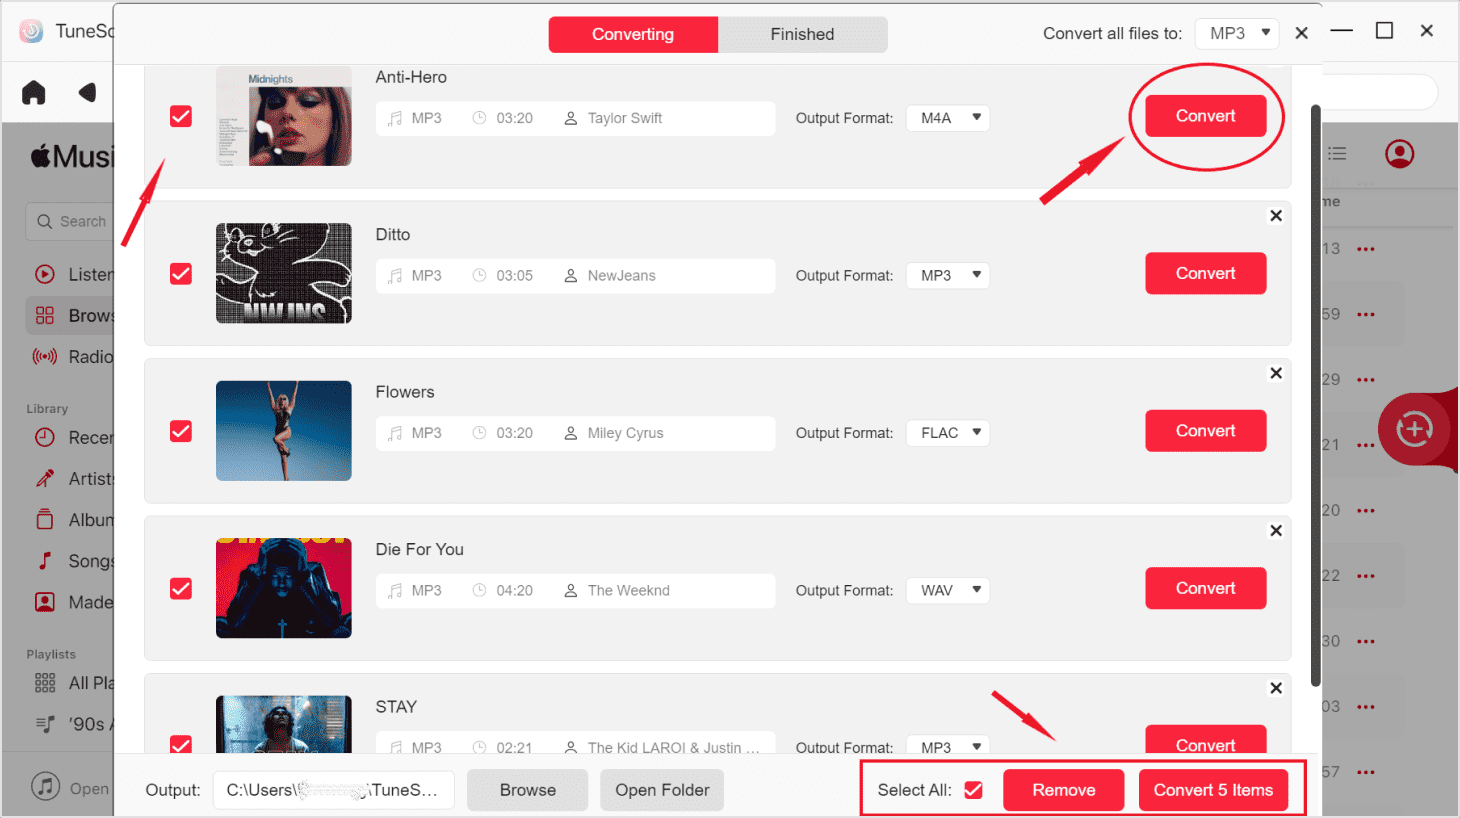
Step #3. Finally, Tick the “Convert” Button at the Bottom
Once step 2 has been done, you can click the “Convert” button that you can see at the bottom of the page. While the process of conversion is ongoing, DRM removal will also be done. In a few minutes, you will now be seeing the converted files and you can now use those as ringtones. To place the songs on your iPhone, you can follow the procedure discussed in the second part of this article.
Part 4. The Summary
It is simple to create ringtone in iTunes. You have two options that you can use. You can use this article as your guide in case you want to proceed with the process. If there are any other processes that you know, we would like to know your comments in the below section!

