How to Remove Devices from Spotify [2026 Complete Guide]
Spotify is a music streaming service that is not only known for giving us a wide range of music. It is also known to have a set of features that are really helpful and advantageous to the users. One of those features is the capability to connect a lot of devices into the app itself for the purpose of creating a wider reach. However, this connection of multiple devices into the Spotify app might cause a problem or issue later on such as the blocking of signals or the slowing down of the app and the connected device for example. The question nowhere should be “how to remove devices from Spotify?”.
Later in this article, we will be having a discussion about how to remove devices from Spotify on your Android phone, PC, or iPhone. Discussion about how to cancel your Spotify Premium subscription. And also, I will be sharing the perfect tool that you may use in keeping your favorite Spotify songs and playlists even after your Premium subscription was canceled.
Article Content Part 1. How to Remove Devices from Spotify?Part 2. How to Cancel Spotify Premium?Part 3. How to Keep Spotify Songs after Cancelling Premium?Part 4. In Conclusion
Part 1. How to Remove Devices from Spotify?
Since Spotify has a lot of versions including that for Windows or desktop computers and that for mobile devices, there are multiple methods that we can use on how to remove devices from the Spotify app especially if you have connected a lot of devices to it. So below, I will be discussing the detailed steps on how to remove devices from Spotify on your PC, Android phone, and on your iPhone. Feel free to use this discussion as your reference and guidelines on how to remove devices from the Spotify app installed in your device.
How to Remove a Spotify Device On Your PC/Mac?
Step 1. For the first step to take, you have to open the Spotify app on your Mac or PC.
Step 2. At the main interface of the Spotify app, take a look at the upper right part where your username is located. Right next to your username is an arrow pointing downwards. After locating it, click on its icon.
Step 3. From the list of options displayed next on your screen, choose the “Account” option.
Step 4. If you are using your browsers such as Chrome and Firefox, you will be given the “Account Overview” page.
Step 5. After doing so, continue browsing until you reach the bottom of the page.
Step 6. At the very last part, you will see the button for “Sign Out Everywhere”. Click on this button to finally have all the devices that have been connected to your Spotify app removed from it.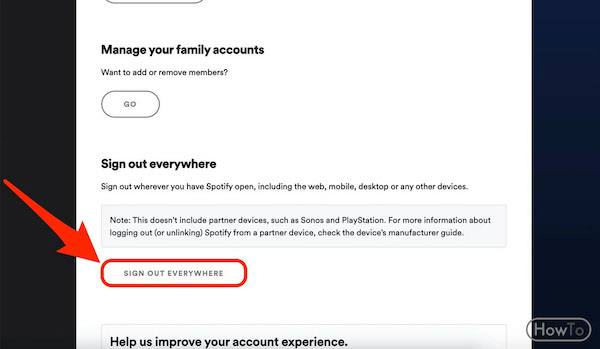
After following all of the steps on how to remove devices from Spotify app, you will not have to worry anymore about the issues caused by the connected devices to access your Spotify favorites.
How to Remove a Spotify Device on Android/iPhone?
If the device that you are using is an Android phone or iPhone, listed below are the steps to follow on how to remove devices from the Spotify app.
Step 1. The first thing that you must do is to get your Android phone or iPhone and open your Spotify app.
Step 2. Now, locate the gear icon on the main page of the app and click it. This is actually the representation of the Spotify Music app.
Step 3. After clicking on the Settings of your Spotify Android or iPhone version, look for the option of “Devices”.
Step 4. Right after that, select the “Devices Menu”.
Step 5. After clicking on it, you will be shown all the devices that you have connected to your Spotify app. Continue browsing until you see the device that you want to remove from the list.
Step 6. Right next to the connected devices is an icon that you must tap in order to officially delete it from the list of connected devices.
Step 7. Tapping on the mentioned icon will be the main indication that the device will be removed. A confirmation will then appear on your screen (specifically at the bottom part of your screen) saying that the device selected was finally deleted.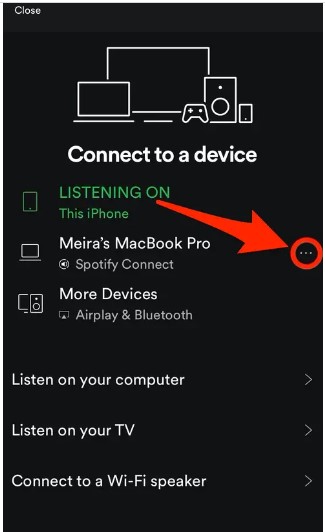
And also, as a quick piece of information for you, if someone else has been using your Spotify account, there will be a message or notification that it is being used on some other device. Once you have received this notification, quickly execute the procedure on how to remove devices from Spotify. Lastly, before I end this part, if you wish to play your Spotify favorites for the purpose of the wider reach of music, you can make use of “Spotify Connect” to connect it to some other devices such as Sonos or smart speakers.
Part 2. How to Cancel Spotify Premium?
The question now is what if you want to switch on using another music app but you currently have a subscription to Spotify Premium? How are you going to cancel your Spotify Premium account? For whatever reason you may have, I will be sharing the procedure that you may follow if you want to cancel your Spotify Premium subscription.
Actually, you can have your Premium subscription canceled anytime by just using your mobile or desktop browser in accessing the official website of Spotify Music. But on the other hand, you should take note that you cannot just do this procedure of canceling your Spotify Premium subscription in your installed Spotify app in any of your used devices including your iPhone, Android, Mac, or Windows. So, the best thing that you could do is to follow the simple steps enumerated below.
Step 1. For the first step, go to the official website of Spotify and then sign in using your existing Spotify Premium account.
Step 2. Right after that, take a look at the upper right corner of your screen where your profile icon is located. Click on it and then select “Account”.
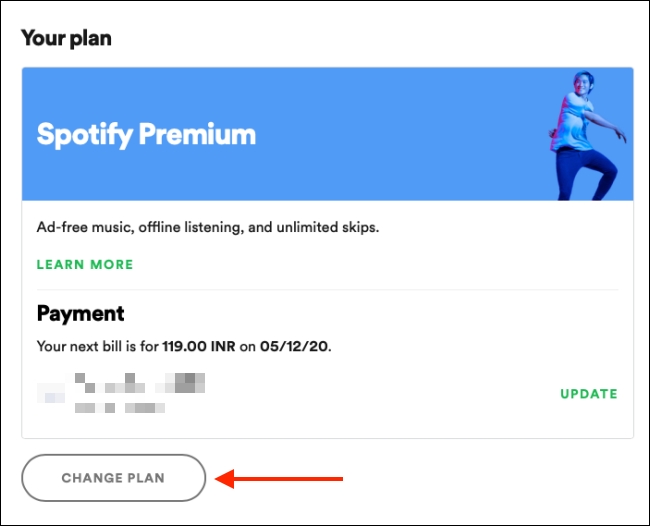
Step 3. From the set of options shown next, continue scrolling until you see the section for “Spotify Premium”. Clicking on this will show you your next billing date and the bank account that you have linked in paying your Spotify Premium subscription. Now, click on “Change Plan”.
Step 4. After doing so, you will then see the list of all the plans that you may use. At the section of “Spotify Free”, you will see a description below saying “switching to free will cancel your Premium plan”. Right after doing that, take a look as well at the button of “Cancel Premium” located at the lower right part of the window.
Step 5. Now, right after clicking on the button of “Cancel Premium”, you will be asked if you were already sure to cancel your Premium subscription. You have to click on the button “Yes, cancel” in order to end your Premium subscription.
Step 6. If the process of canceling the subscription was already finished and successfully done, a new page will be shown on your screen for confirmation that your Spotify Premium subscription has already been canceled. The exact date of the end of your existing subscription will be displayed on your screen as well.
Part 3. How to Keep Spotify Songs after Cancelling Premium?
A while ago, we discussed how to cancel your Spotify Premium subscription Now, we will be discussing how to retain all of your favorite Spotify songs and playlists after canceling your Spotify Premium subscription. All you have to do is to make use of a powerful tool that is very capable of saving the song files in your device permanently even without a subscription.
I know that you were already aware that if you have a Spotify Premium subscription, you are capable of downloading the songs on your device for the purpose of offline listening. But though you have saved them, after your Spotify Premium subscription was gone, all the saved songs and playlists will disappear as well. So, you have to make use of TuneSolo Spotify Music Converter so that these songs will be saved in your device forever even after your subscription was canceled or has already expired.
Key Features Of TuneSolo Spotify Music Converter
Download Spotify Songs And Playlists
One of the key features of TuneSolo Spotify Music Converter is its capability to download the songs on your device permanently. As was just mentioned, the download feature is actually exclusive for the Premium users alone but through the help of TuneSolo Spotify Music Converter, even the free users can download the songs on their device permanently. The download feature can be enjoyed by them as well.
Offline Listening
Offline listening is actually next to the feature of downloading. Once the songs are successfully downloaded to your used device, you can have the songs played any time you want and, in any place, you were at. With the help of this TuneSolo Spotify Music Converter feature, you will not have to worry about your mobile data or a stable internet connection.
Convert Spotify Songs To Other Audio Formats
In addition to the features already discussed is the conversion feature. TuneSolo Spotify Music Converter can help you as well in converting your favorite Spotify songs into other output formats that are accessible on a lot of devices. You may choose from MP3, WAV, AAC, and FLAC output format.
Play The Songs In Many Devices
Once the songs are converted into another audio format and were saved in your device permanently, you can now play them on any device of your choice. The Spotify Premium users can only play the songs on up to 3 devices only because of the DRM (Digital Rights Management) protection encrypted into them. Because of DRM, only authorized and supported devices can be used in playing Spotify songs. But with the help of TuneSolo Spotify Music Converter, you will be able to play them on a lot of devices around you.
Fast Conversion Speed
Another advantage of using TuneSolo Spotify Music Converter is its capability to convert the songs into another audio format and download them to your device in just a couple of minutes. Through the help of this feature, the users can save a bunch of their time and be able to use it in some other activities. TuneSolo Spotify Music Converter can finish the entire procedure in up to 5x speed of conversion which is way faster than any other conversion speed.
Preserves Important Information Such As ID3 Tags And Metadata Info
TuneSolo Spotify Music Converter is also very capable of retaining all the important details of the songs including the ID3 tags and Metadata info of songs. Even after undergoing the process of conversion, all these important details could be retained and kept from the songs.
Organize Your Own Music Library
TuneSolo Spotify Music Converter even lets you organize your own music library. You can categorize the contents by any category you prefer to have. You can have them arranged by album, by artist, or by genre depending on what will work the best on you. With this kind of feature, you can easily find your target file. You won’t have the need anymore to browse the song list one by one but instead, you can just click a certain category and then locate your target file. You can save a lot of your time as well with the help of this feature.
Free Updates And Unlimited Help From The Technical Support Team
All the users of TuneSolo Spotify Music Converter are entitled to free updates whenever there is one available. You can also ask for the help of the technical support team if in case you encounter a problem in the middle of the process.
How to Download Spotify Songs for Free
Step 1. Download And Launch TuneSolo Spotify Music Converter
In order to download TuneSolo Spotify Music Converter, you have to proceed to the application store of your device and then download TuneSolo from there. Another option is to go to the official website of TuneSolo and download the app from the site as well. Right after downloading the app, install it on your device and have it launched.
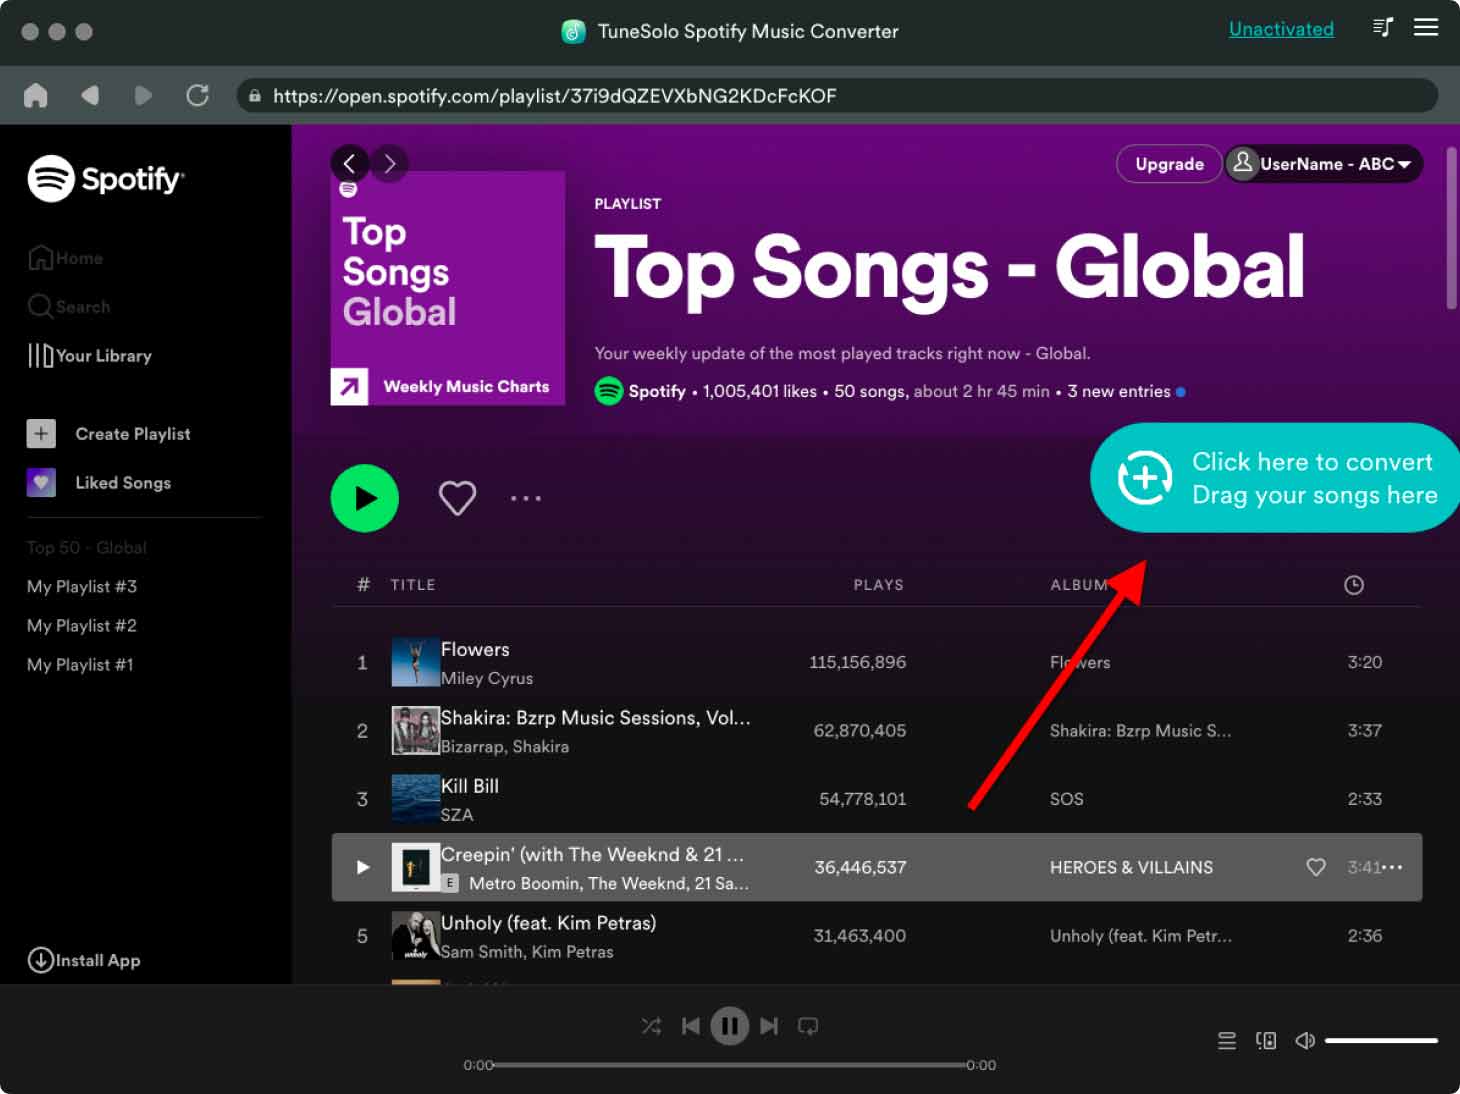
Step 2. Upload The Songs Into TuneSolo Spotify Music Converter
After installing the app, wait for a couple of minutes until it reads or recognizes your Spotify music library. Once your Spotify songs and playlists are recognized, you may now start uploading the songs into the converter by just copying the link of the song and then pasting it into the converter. Another way of uploading the songs is by dragging them from your Spotify library and then dropping them into the area allotted in the converter.
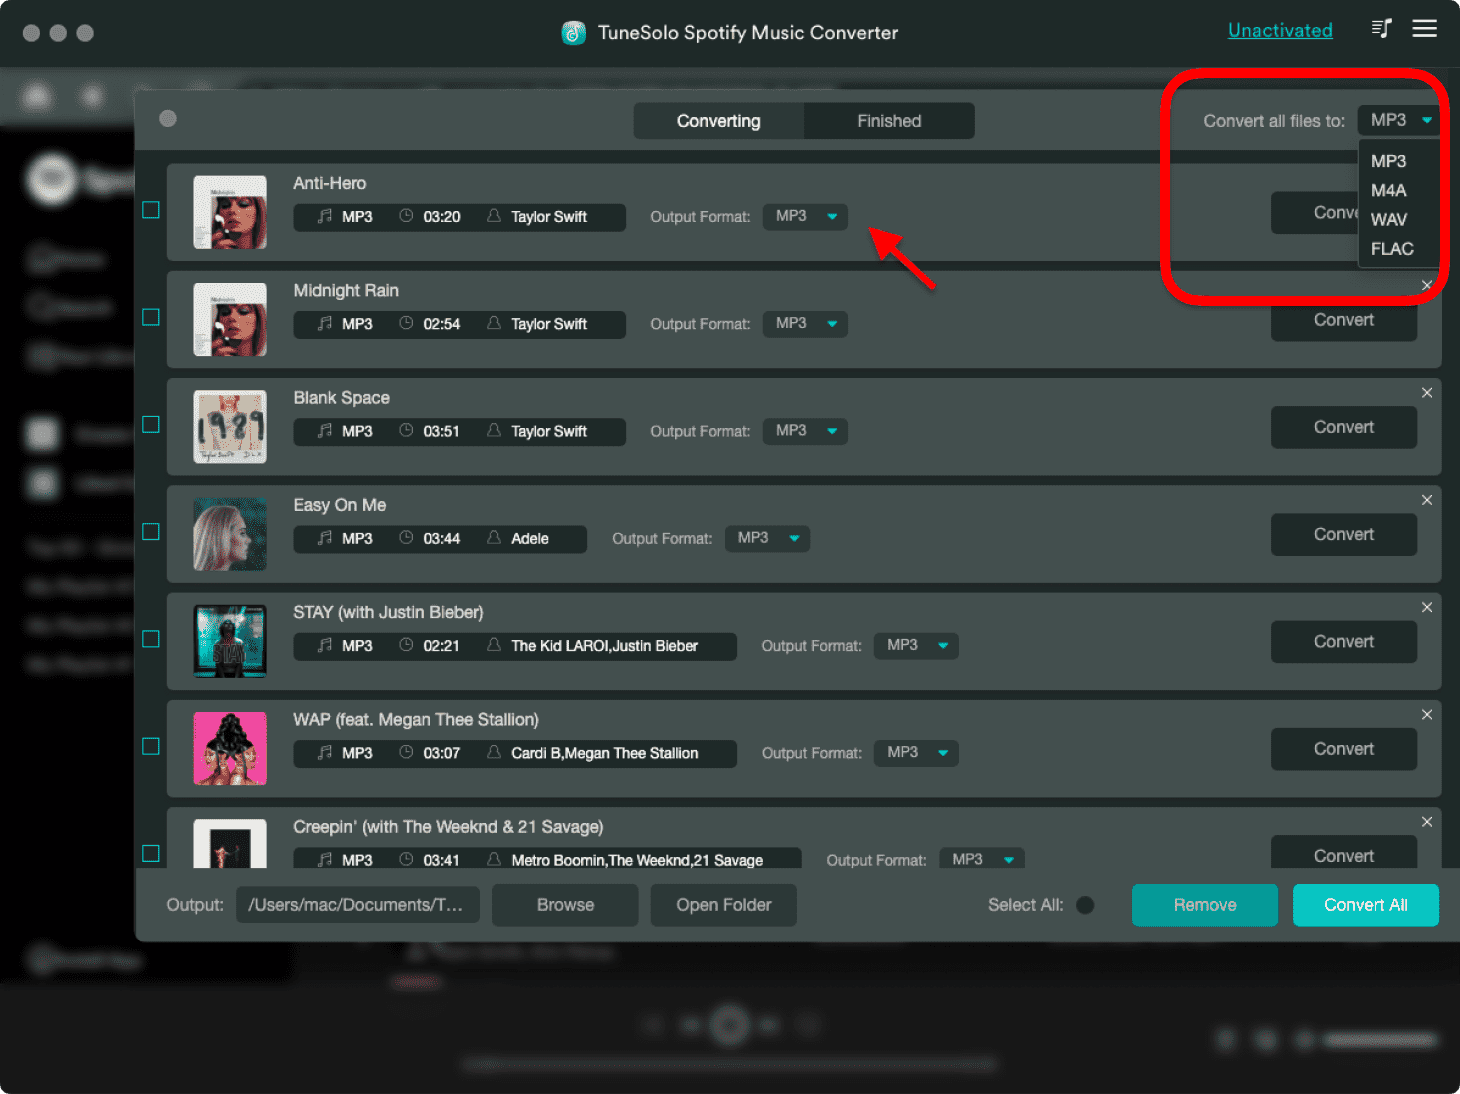
Step 3. Select The Output Format Of Songs
Once the songs are uploaded to the music converter, you may now start selecting the output format of songs. You may choose from any of these audio formats, MP3, WAV, AAC, and FLAC output format.
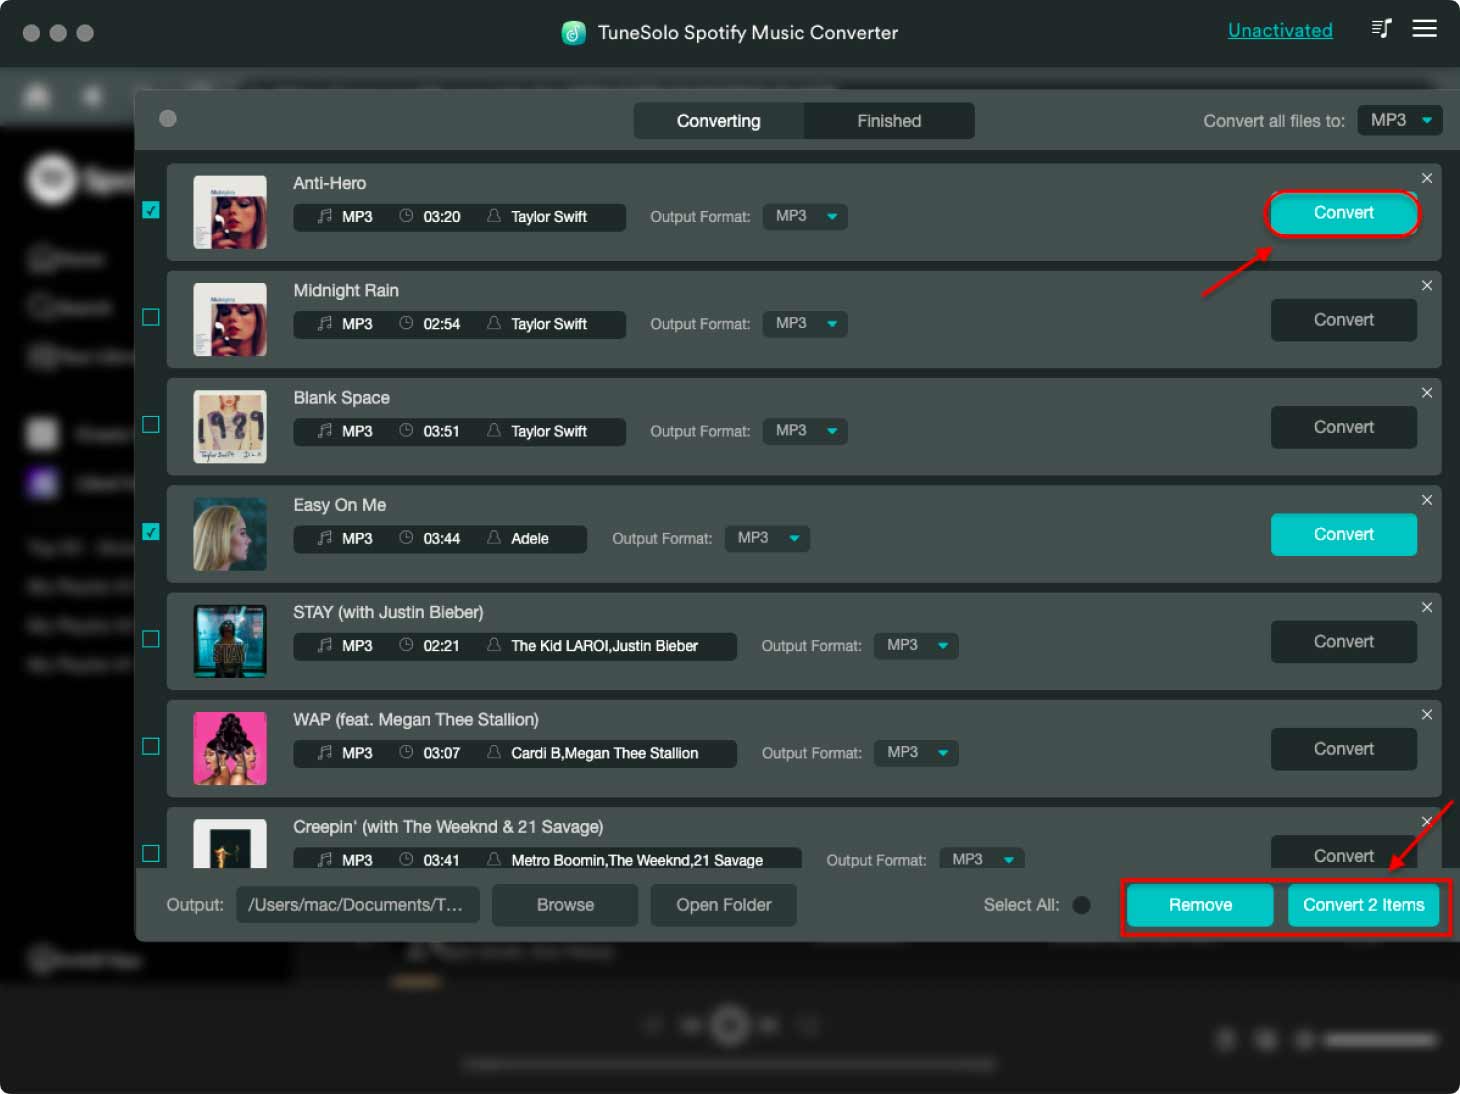
Step 4. Click the Convert All Button
Now that the songs are completely uploaded in the music converter and the output format was chosen already, you may now click on the “Convert All” button.
Step 5. Get The Converted Songs And Save Them In Your Device
For the last step of the procedure, you may now check and review the songs after the conversion process was done. You may check and get them by clicking on the View Output File button.
After following all these steps, you may now be able to save the songs on your device permanently. Now, without having a Spotify Premium subscription or even after the cancellation of it, you can still listen to your Spotify favorites anytime you want to and wherever you are. You will not have to even worry about the stable signal and the mobile data that you will consume in streaming the songs.
Part 4. In Conclusion
Let us say that you downloaded all of your favorite songs and tracks through the help of your Spotify Premium subscription, are you aware that these songs and playlists could not be kept in your device forever once your Premium subscription has ended? Sad to say that it would be the case once your Premium subscription was gone.
So, the best thing that you could do about this is to learn how to use TuneSolo Spotify Music Converter in keeping all of your favorite Spotify songs on your device even without a Premium subscription. I do hope as well that the procedure discussed on how to remove devices from Spotify helped you a lot in addressing the problems and issues encountered when multiple devices are connected in your Spotify app.

