Top 5 Solutions to Fix Apple Music Library Not Syncing Issue
As a fan of Apple Music, I think you must have encountered the following problems. Situations like "Apple Music sync library not showing", "My Music Disappeared from iTunes Library", "iTunes Not Syncing All Songs" and "How to Recover Apple Music Library" will be touched upon and solved.
If you have also faced the same problems but don't know how to solve them, here we will introduce some methods that you can use as a guide to solve the problem. Understanding these procedures in detail will help especially those who are not yet familiar with how these solutions are accomplished.
We will also share information about the application software that is capable of downloading all the Apple Music tracks you want. And, if used, you'll be able to eliminate the syncing process from your iOS device to another and even stream on any device.
Article Content Part 1. Why is My Apple Music Not Syncing?Part 2. How to Fix Apple Music Library Not Syncing Issue?Part 3. Bonus: Download Apple Music Library Forever to Avoid Not Syncing IssuePart 4. The Summary
Part 1. Why is My Apple Music Not Syncing?
In order to fully enjoy the benefits that are being offered by the Apple Music application, the users need to purchase a subscription that is being paid on a monthly basis. There are several plans being offers – an individual plan, a family plan, and even a plan for students (there is also a free trial version that can be checked out by those who are still unsure if will proceed with subscribing).
If you tried availing the subscription, you would find out that you can have your account access on other iOS devices that you have as long as you will be using the same credentials registered. But what if you experienced some issues when it comes to syncing from one device to another?
If you will be reading numerous comments raised by many Apple Music users via the community platforms, you will see some instances and experiences about this “Apple Music sync library” issue. You would be seeing notes saying, "why is my Apple Music not syncing my library?" "my music disappeared from iTunes library, is there anything I can do to correct this?" or asking how to restore Apple Music library. But what particularly are the reasons behind this problem?
Actually, there are many reasons why your Apple Music library is not syncing some songs or even the entire music library that you have. Here are those.
Network issues:
Sometimes an unstable Internet connection may be the main reason why your Apple Music library cannot be synced or Apple Music sync library not showing. So make sure you use a stable internet connection.
Outdated software:
You might be using an outdated or an old version of the iTunes application and this could cause Apple Music not syncing your library.
Incorrect settings:
- There could be some errors in the syncing settings. There could be some improper configurations that need to be corrected.
- When trying to sync Apple Music from your PC to your handy device like iPhone, you might have forgotten to tick the “Trust this device” option.
- Forgetting to check the iCloud Music Library setting on your iPhone may also cause Apple Music library not syncing.
Other Possible Reasons:
- The USB cable that you are using while trying to connect from your PC to your iPhone might be damaged or is not working properly.
- There could be some issues when it comes to locating the music or tracks that are needed to be synced.
- when some tracks are under the “unknown” group on the device that you are using may also prevent Applpe Music from syncing your entire music library.
These are the usual reasons why the Apple Music sync library” issue keeps on occurring. If you are not sure how to correct the problem, there is nothing to think about because the ways to solve it will be presented as you proceed to the second part of this article.
Part 2. How to Fix Apple Music Library Not Syncing Issue?
After learning about the reasons behind why Apple Music not syncing or Apple Music sync libraray not showing,you may wonder know how to restore Apple Music library. Don't worry, there are five methods that would be presented in this portion of the post that you can use as your reference to correct and finally solve this “Apple Music sync library” issue. The steps for each method will also be presented here.
Method 1. Turn on iCloud Music Library on Your Devices
We will be giving you the procedures on how you can turn on your iCloud Music Library on your handy devices like iPhone, iPod Touch, or iPad, on your Mac computer, and even on your Windows personal computer in the first method. You should take note that iCloud is responsible for keeping the syncing process possible from one device to another. Therefore, if this is disabled, then the chosen music files won’t sync resulting in issues on your Apple Music application.
Let us begin with the steps needed to be accomplished if you are to do it on your handy gadgets.
#1. On iPhone, iPad, or iPod touch
The process on how you can enable your iCloud Music library on your handy iOS devices is so easy. Here are the steps that you must follow.
Step #1. On your iOS device, head to the “Settings” button.
Step #2. Scroll down and look for the option that is saying “Music”.
Step #3. You would need to toggle the slider for the iCloud Music Library to have it enabled. The green color would symbolize that this is done successfully.
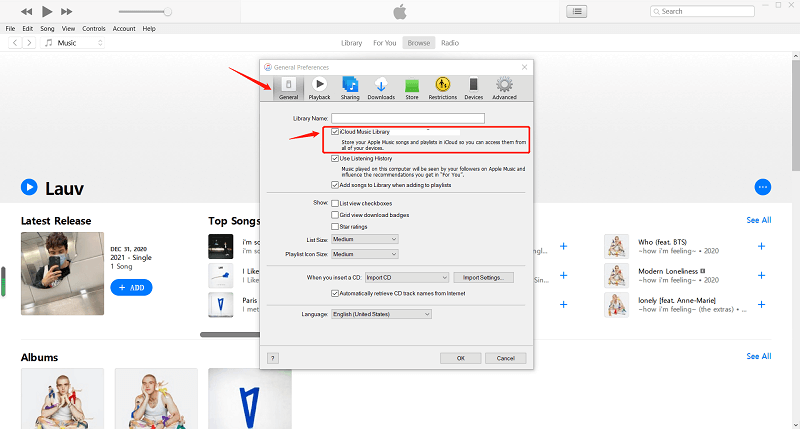
#2. On Your Mac
If you are using a Mac computer, you can follow the below guide.
Step #1. Open your Mac and your iTunes application.
Step #2. Hit the “iTunes” button located at the top left corner of the screen. From the new options displayed, click the “Preferences” button.
Step #3. You will see new options on the screen, under the “iCloud Music Library” option, make sure to put a checkmark and then tick the “OK” button to save the changes.
#3. On Your PC with iTunes for Windows Users
If you happen to use a Windows personal computer, the process is almost the same as when you are doing it on a Mac computer.
Step #1. Launch the iTunes application on your Windows personal computer.
Step #2. Choose the “Edit” menu that is on the top area of the screen. You would need to tick the “Preferences” button as well.
Step #3. From those that you are seeing on the screen, make sure that you will be putting a checkmark alongside the “iCloud Music Library” option.
Step #4. Ensuring that the “OK” button will be clicked will help you ensure that the changes made are saved.
Method 2. Update iOS and iTunes and Restart Device
The next method to be discussed is to update the iOS device as well as the iTunes application. As initially mentioned, one reason that is causing the “Apple Music sync library” issue is an outdated version of the iTunes application. In order to have your iTunes app updated, you just need to head to the Apple or Google Play Store and tick the “Update” option.
In order to update your iOS device, simply go to your phone’s “Settings”, tick the “General” button, and then “Software Update”. You need to click the “Download” button and finally the “Install” option in order to download all the available updates and continue with the installation process.
Once done with all the updates, restarting your device must be done.
Method 3. Update iCloud Music Library Manually from iTunes
Another method is to do the update of the iCloud Music Library from the iTunes application manually. But how do I manually sync my Apple Music library? To do so, you need to follow the below.
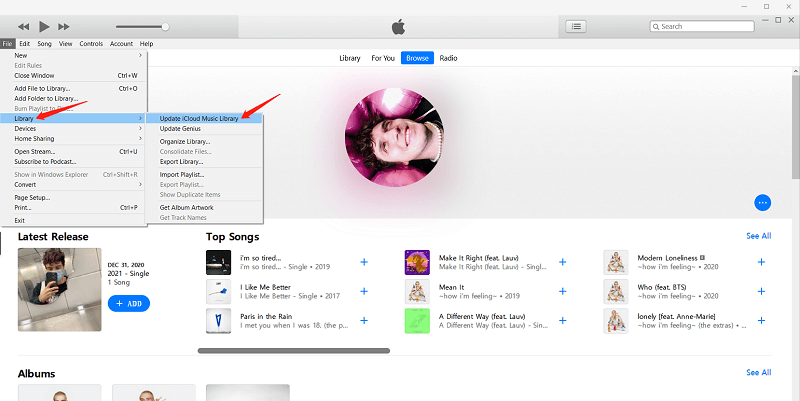
Step #1. Open your iTunes application.
Step #2. Tick the “File” button and hover to the “Library” menu.
Step #3. From the options that you are seeing, tap the “Update iCloud Music Library”.
You need to wait for some time until the tracks are uploaded to your iCloud Music Library.
Method 4. Make Sure that You Use the Same Apple ID
The last method in the second part of this article is making sure that you are using the same Apple ID across all devices that you are using via the syncing process. In order to check what Apple ID you are currently using, you can follow the below guide.
Step #1. On your handy device, go to the “Settings” option and from there, you will see the Apple ID that is currently being used.
Step #2. On the iTunes application that you have on your personal computer, tick the “Store” option followed by the “Account Link”. By doing this, you will be able to verify what Apple ID is being used on your PC.
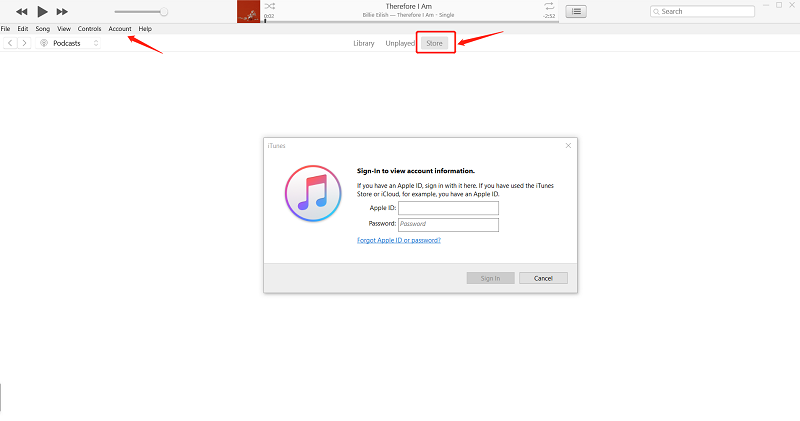
If you found out that both devices are using different Apple IDs, you might need to log out one device and match the Apple IDs to proceed with the syncing process.
Method 5. Make Sure Stable Internet Connection
To sync your music library on Apple Music, you need a stable Wi-Fi or cellular data connection. If your Wi-Fi is stable, use it to sync your music. Confirm your selection by going to Settings > Music > Cellular Data.
You can try all these five methods above to fix why Apple Music library not syncing. In case none of these worked, we are recommending using a tool that can download Apple Music songs. Thus, avoiding the tedious syncing process. To know more about this, proceed to the next portion of this article.
Part 3. Bonus: Download Apple Music Library Forever to Avoid Not Syncing Issue
The Apple Music Sync Library feature requires an internet connection to use, which can cause a lot of problems. If you have tried the above 5 fixes and Apple Music Sync Library is still not working properly, then you should consider downloading your Apple Music Library so that you can avoid why your Apple Music Library won’t sync.
There is a way in order to keep all Apple Music songs on your device and have those transferred easily to other devices that you have. This is via the help of this TuneSolo Apple Music Converter. This tool can offer several perks to its users including the following:
- The ability to remove the DRM protection of Apple Music songs making the tracks downloadable and accessible on any device.
- The TuneSolo Apple Music Converter can also do the batch conversion helping the users process multiple files if needed.
- Users can be assured that the quality of the output files (after the conversion process) is great.
- This also does the fast conversion and downloading of files.
- Numerous output formats are supported by this tool as well giving the users the chance to choose from a wide array of options.
- The requirements are few and simple to complete.
- And, the detailed conversion procedure is simple to understand.
Here are the specific steps to download your Apple Music library permanently to avoid Apple Music library not syncing.
- Launch your TuneSolo Apple Music Converter and choose the songs to be converted.
- Select an output format and modify the settings if you want.
- Wait until the DRM protection is removed, and files are converted.
Here are the details for your easy reference.
Step #1. Launch your TuneSolo Apple Music Converter and Choose the Songs to be Converted
Once you have done the installation process, open the application. Now, choose the Apple Music tracks that you want to convert and upload those on the platform. Do this by manually adding the files or dragging and dropping those.

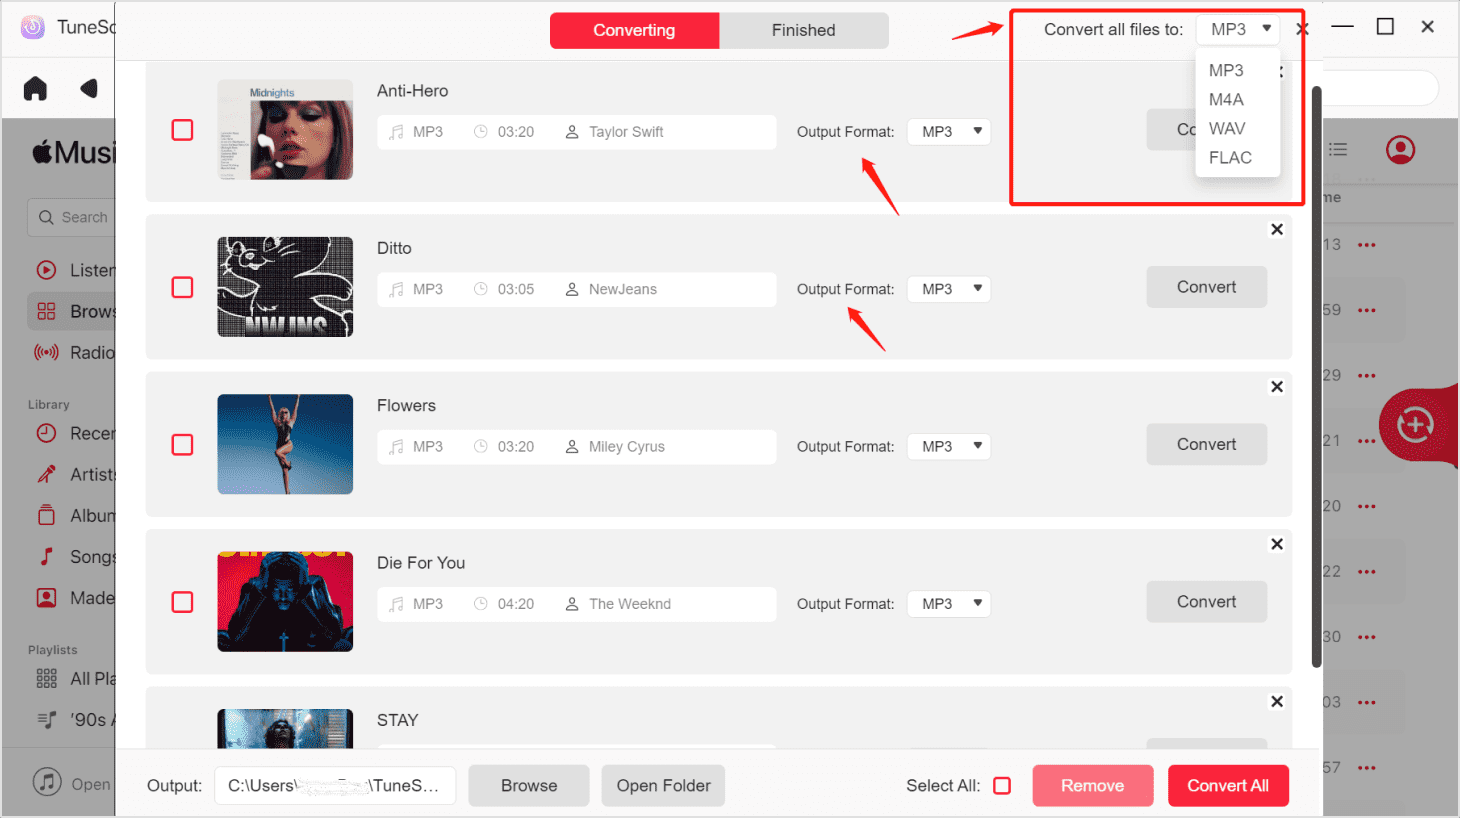
Step #2. Select an Output Format and Modify the Settings if You Want
Once you have uploaded all the Apple Music tracks that you want to convert, you may now choose the output format from the options and do some modification of the output settings if preferred. We recommend choosing a format (like MP3) that is playable on almost all devices. Also, by defining an output path, you will be easily able to check the converted files once the process has been completed.
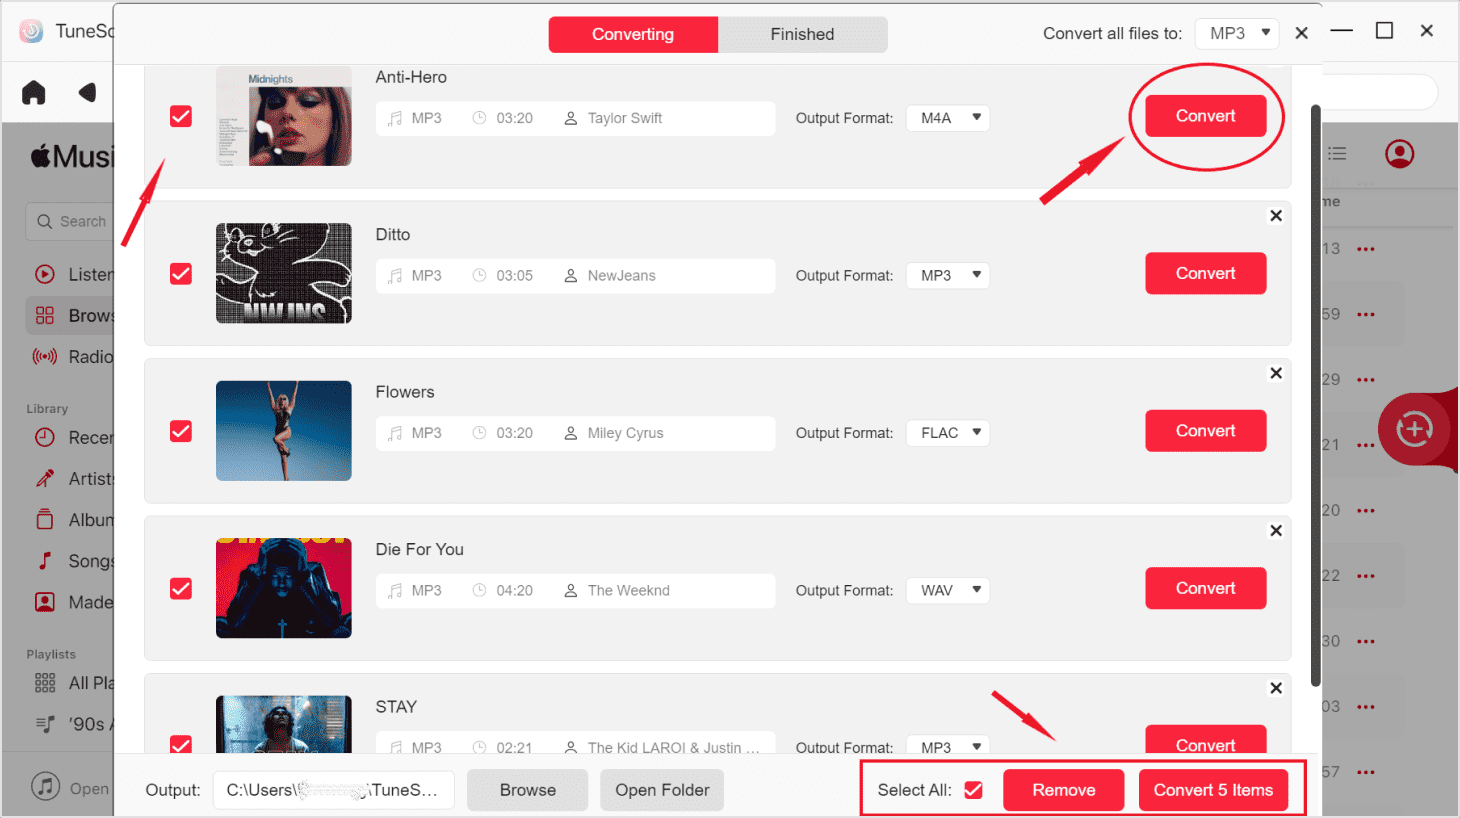
Step #3. Wait Until the DRM Protection is Removed, and Files are Converted
After clicking the “Convert” button, the DRM protection of the Apple Music files will be removed. And, the conversion process will also be done. After a few minutes, the converted tracks will be ready for streaming and even sharing to other devices (since the DRM protection has been removed already).
Part 4. The Summary
In order to fix the “Apple Music Library syncing” issue, there are five methods that can be applied by every user (as mentioned previously). But if you wish to immediately eliminate the syncing process and save the Apple Music songs on any device you have, using the TuneSolo Apple Music Converter would be the best option.

