iTunes Songs Greyed Out: How to Fix?
Every music listeners will agree that iTunes is one of the best streaming service providers in the music industry. Apart from being able to offer that perk (being a trusted media player), this application can also be used to store files including videos and images, and even manage your library. However, there were reported cases before that a certain iTunes song greyed out all of a sudden. And, the user has no knowledge of how the issue can be solved and fixed.
Though iTunes is one of the applications that continuously serve the needs of the many music enthusiasts out there, we can’t disagree that possible issues like the above might arise – iTunes songs greyed out on mobile devices or iTunes greyed out on MAC or Windows personal computer. As an iTunes user, you are surely curious about why such is happening and how you can have those fixed to continue streaming the music and tracks that you love. You are lucky enough because in this article those topics will be highlighted and tackled.
We know that you are excited to know more details about the topic so go on and jump to the first part of this article.
Article Content Part 1. Why Are iTunes Songs Greyed Out?Part 2. How to Fix Greyed Out Songs on iTunes?Part 3. How Do We Sync iTunes Library to Avoid iTunes Song Greyed Out?Part 4. Summary
Part 1. Why Are iTunes Songs Greyed Out?
In the iTunes community, many people have this question: Why is my iTunes song grayed out with a dotted circle? Having an idea about the background of why issues like this - iTunes songs greyed out, is happening is definitely good for those users who kept using an application. Because we want to share with you the common reasons why your iTunes songs greyed out at some moment when you are trying to access them, we have consolidated the list for your easy reference.
- Local files syncing issue: Your iTunes songs could grey out as a result of the syncing issue. There could be problems encountered while you are trying to sync some songs across all devices that you have.
Also Read: iTunes Playlist not Syncing
- Corrupted content: Another possible reason while you selected iTunes songs suddenly greyed out is that the songs might be corrupted. It could happen when a file was accidentally deleted, and your iTunes library was not updated.
- DRM restrictions: The tracks could also be unsupported and are protected by DRM. So this is why your iTunes songs greyed out.
Also Read: How to Remove DRM from iTunes
- Licensing issues: You can also consider the licensing issue as one of the causes of the “iTunes songs greyed out” issue. There are iTunes songs with licenses every time you purchased those from the store. This only means that if you are trying to access those on another device, the songs might grey out.
Now that you already knew some possible causes relating to this “iTunes songs greyed out” issue, you can now check out the basic and common solutions that you can try and apply to solve the problem. Those are what we are to highlight in the second part of this article.
Part 2. Top 6 Solutions to Fix Greyed Out Songs on iTunes
This portion of the article will be divided into two portions – the common solutions that you can apply using your personal computer, and the basic fixes that you can try on your handy devices like iPad and iPhone.
#1. Fix on Computer
You might be streaming your favorite iTunes songs via your personal computer. To solve the “iTunes songs greyed out” issue, here are some procedures that you can follow.
Solution 1: Try Checking the Settings of your iTunes Application
There are some cases that the iTunes songs greyed out” issue will occur due to your iTunes settings. You can follow the below guide to check and review your iTunes settings.
Step #1. Launch your iTunes application on your PC and select the song that greyed out. Right-click to proceed.
Step #2. There will be new options that will be reflected on the screen. From those, select the “Check Selection” menu.
Step #3. After doing the second step, try to see if you can now play the greyed-out song.
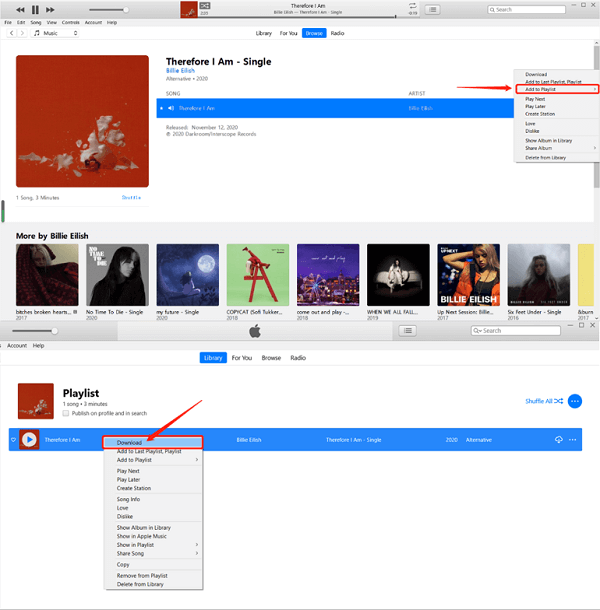
Solution 2: Do the Redownloading of the Songs that Greyed Out
Another basic solution is to try redownloading the songs that greyed out. This will include the process of song deletion before downloading. Here is how you can do it.
Step #1. On your computer, open your iTunes application. You will see the iTunes store at the top right corner of the main page.
Step #2. Tap on your name and search for the option to purchase songs. You can also see all those tracks that you have previously purchased.
Step #3. Now, choose the music that greyed out and do the redownloading from the iTunes application.
Solution 3: Try Resyncing the Greyed Out Songs
As initially mentioned, one of the possible causes of this “iTunes songs greyed out” issue is the problem that you might have encountered when trying to sync the songs. To correct this, here is what you can try.
Step #1. Do the deletion of those songs that greyed out.
Step #2. Refresh your iTunes library and those playlists that you have.
Step #3. Connect your iOS device to your computer using a USB cable and re-sync those greyed-out songs.
Upon finishing, you should be able to play those songs again if the issue is really about the syncing process.
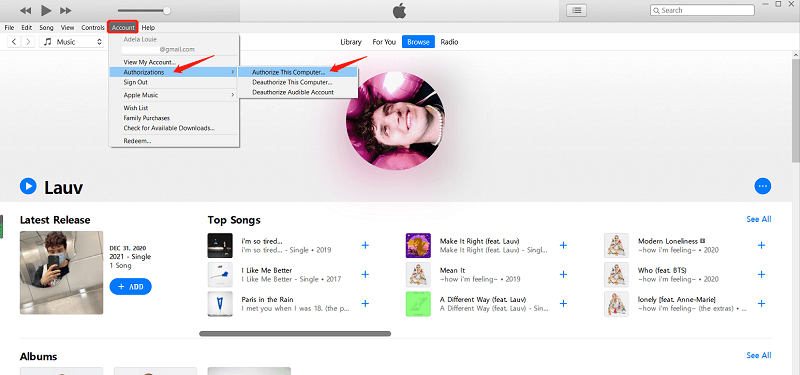
Solution 4: Try to Reauthorize your Personal Computer
If you have tried all those presented above to fix songs greyed out in itunes but none worked, you can use this procedure as your last resort.
Step #1. Open your iTunes application and on your library, hit the “Store” option that you can see on the menu.
Step #2. You will see the options on the screen, choose the “Deauthorize This Computer” selection from the drop-down that you will see. Now, you need to sign out from your account.
Step #3. Restart the application and open your iTunes library again. Head to the “Store” tab again and tick the “Authorize this Computer” option.
#2. Fix on iPhone and iPad
Upon discussing the basic fixes that you can do via your personal computer; you can also check the below items that you can try in case you would like to solve the issue on your iPhone or iPad.
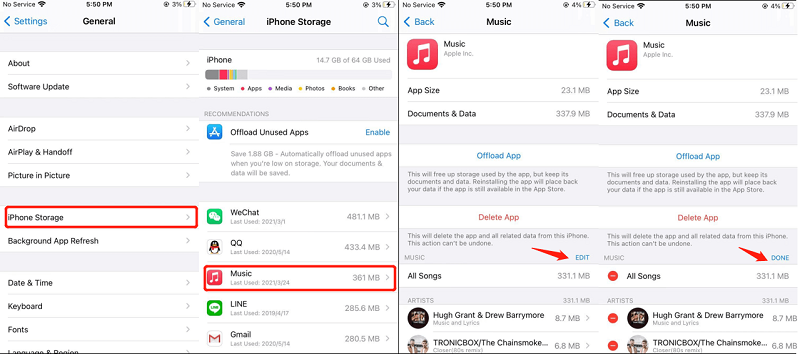
Solution 5: Try Resyncing the iTunes Songs on your iPhone or iPad
Step #1. On your iPhone or iPad, go to the “Settings” option and hit the “Genera” menu. Look for the “Storage” option or the “Storage & Cloud Usage” menu.
Step #2. Choose the “Manage Storage” option and hit the “Music” button. Now, tick the “Edit” menu.
Step #3. Do the deletion of the greyed-out song by hitting the “Red” icon.
Step #4. Lastly, make sure to connect your iPhone or iPad to your personal computer through a USB cable and do the resyncing of your device to the iTunes application to get back the songs.
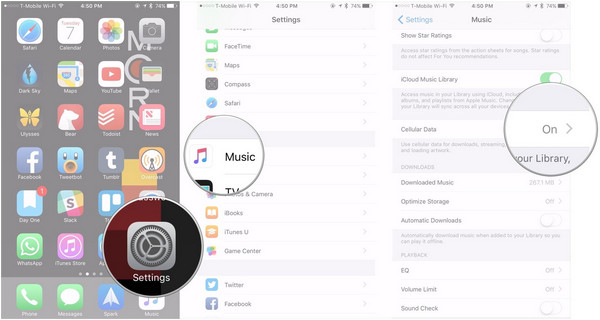
Solution 6: Try to Check and Verify your Network Settings
The Apple Music application lets the users listen to tracks given that you are under a stable WiFi connection (the app uses WiFi by default). Now, if you are currently utilizing your cellular data, this might cause the greying out of the iTunes tracks. You need to check the network settings on your handy device and make sure to also allow the use under cellular data connection.
To do so, follow this two-step procedure.
Step #1. Head to your device’s Settings option.
Step #2. Scroll down and look for the “iTunes & App Store” option. Here, you can enable the “Use Cellular Data” option to finally enjoy those iTunes tracks under your phone’s data connection.
Trying out all the solutions that we have tackled in this part of the article would definitely be good for those who are looking for quick fixes. If you have done all these solutions and still, the “iTunes songs greyed out” issue keeps on happening, then the best thing that you can do is to refer to the third part of this article to know the most effective solution.
Part 3. How Do We Sync iTunes Library to Avoid iTunes Song Greyed Out?
If you are wondering, there is actually a way to keep all your favorite iTunes songs on your devices forever. By doing so, you will be able to avoid the “iTunes songs greyed out” issue and also be able to transfer or share any iTunes file since you can have the protection encrypted on each removed while the process of conversion is ongoing.
We will be sharing with you how effective the TuneSolo Apple Music Converter is in giving you the chance to stream iTunes songs anytime you want to regardless of your location. Here are the advantages that you can get from utilizing this software application.
- The application can convert your iTunes tracks to another format supported. You can choose any from those that the app has. For the complete list, visiting the main page of the app is recommended.
- This is also capable of transforming even your audiobook files. So, if you are also an audiobook streamer, you can have this utilized during the conversion process.
- It can remove the DRM protection encrypted on your iTunes files allowing you to download the tracks and even share those or transfer them on other gadgets for streaming.
- It is reliable and the speed is tested to be too fast making the whole process efficient for every user.
- It can be used by all people even by beginners since the interface is too simple to utilize.
- There are only a few simple things that you need to accomplish to be able to install the app on your PC.
- You can be assured that you can get only the best outputs possible.
- You can do the batch conversion if needed.
- And, the procedure in order to do the conversion and downloading processes are too simple.
If you would like to try using this TuneSolo Apple Music Converter in order to transform your iTunes files into a new format, make sure that your iTunes app and Apple Music app are closed as this will help you ensure that the smooth processing will be done and expected outputs would be enjoyed.
Here is the procedure to sync iTunes library to avoid iTunes song greyed out
Step #1. Open your TuneSolo Apple Music Converter, Select, and Add the iTunes Songs
Once you have the TuneSolo Apple Music Converter installed on your personal computer, launch and open the app. And, on the main page that you will see, make sure to add the tracks that you wish to keep forever on your device. You can use the “Add Files” option or simply move the tracks by dragging and dropping. You can add as many as you want since batch conversion is allowed.

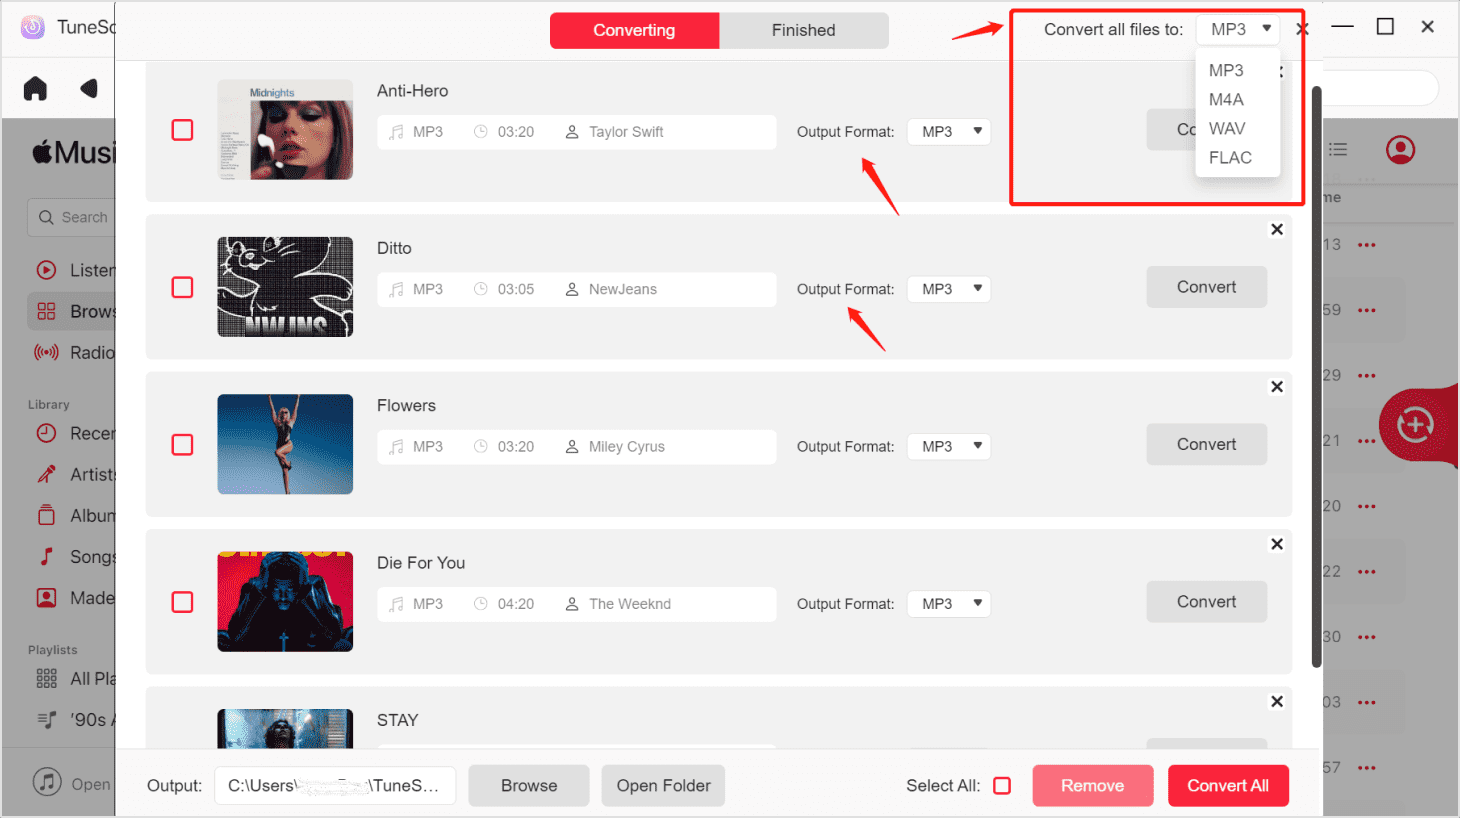
Step #2. Choose MP3 as the Output Format and Modify the Output Settings
Since there are a lot of output formats supported, choose the MP3 format via the downward arrow that you will see alongside the “Output Format” menu. In case you want to convert the files to other formats, you can do it as well. Upon doing so, you can change the settings if you want and define the output path to easily see the files once the conversion has been completed.
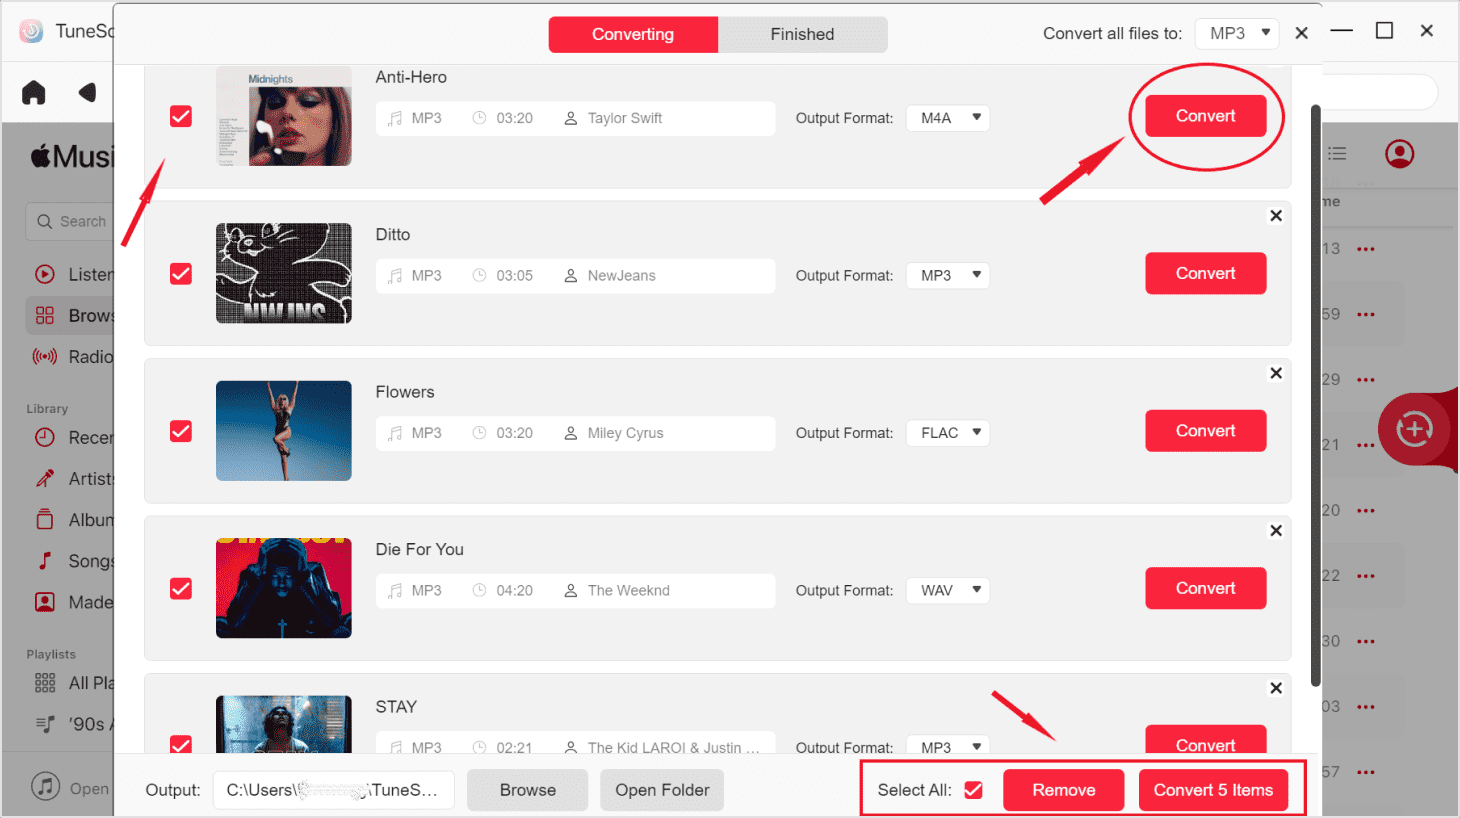
Step #3. Allow the Conversion and the DRM Removal to Happen
Once you are done with the second step, simply tap the “Convert” button that is at the bottom area of the page. By clicking this, you are allowing the process of conversion to happen as well as the DRM protection removal.
Part 4. Summary
Once your iTunes songs greyed out, you have nothing to worry about. There are basic fixes that you can do using your computer or your iPhone or iPad. And, those have been highlighted in this post. If you do not want to try those common solutions, you can jump to the third portion and try this TuneSolo Apple Music Converter. Now click the safe button below to save iTunes songs permanently, so that you no longer have to worry about iTunes songs turning gray.

